Home / Blog /How to change DNS server on Android & iOS ? A step by step guide

How to change DNS server on Android & iOS ? A step by step guide

logo Hidemyacc circle

Do you want faster access and better security when using mobile networks? Learn how to change DNS server settings on Android and iOS devices to improve internet speed and security. Follow our step-by-step guide for quick configuration. Find out with antidetect browser Hidemyacc now!

1. Why should you change DNS on your phone?

Benefits of changing DNS on your phone not only stops at improving access speed but also helps enhance security. When changed Google DNS on phone, especially Android, you will receive outstanding advantages such as:

  • Increase web browsing speed: Job Change DNS on phone to Google DNS helps improve response speed, reduce page load time, especially when using 4G network.

  • Higher security: Set up DNS for your phone not only helps protect personal information but also prevents malicious websites.

  • Access to limited content: How to change DNS on phone helps you bypass regional restrictions, allowing access to websites blocked in some countries.

How to change DNS
Changing your phone's DNS to Google's DNS helps improve response speed and reduce page load time

2. How to change DNS on Android phones

To increase access speed and security on your phone, How to change DNS on Android phone is an effective solution. Job change DNS 1.1.1.1 on Android Not only does it help you improve your browsing performance, but it also keeps your personal information safe. Here are the specific steps to do:

Step 1: Access the Wifi menu on your phone, select the gear icon next to the Wifi network you are connecting to, then click the edit icon (pen) in the upper right corner.

How to change DNS
Go to the wifi section and start making edits

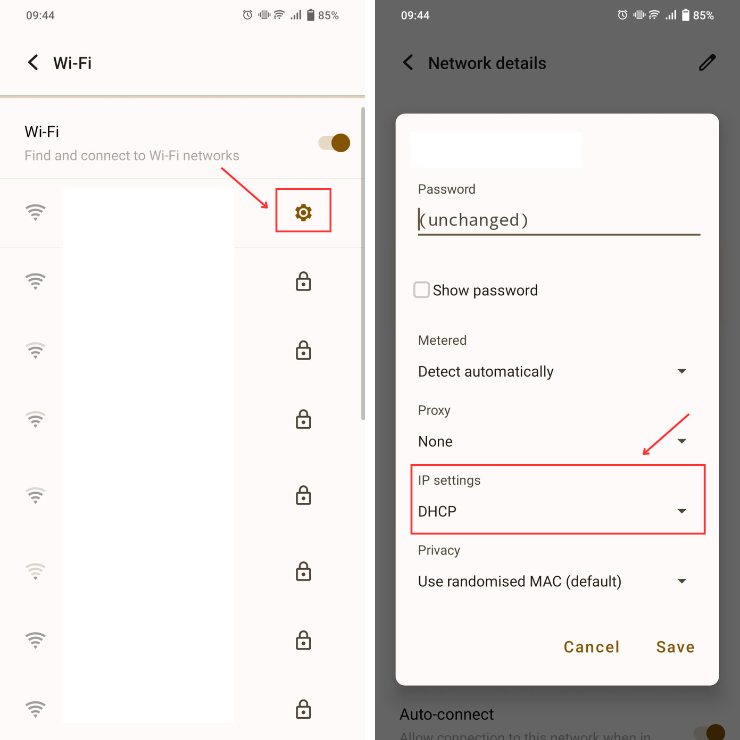
Step 2: In section IP settings, transfer from "DHCP" sang "Static".

How to change DNS
Change from "DHCP" to "Static"

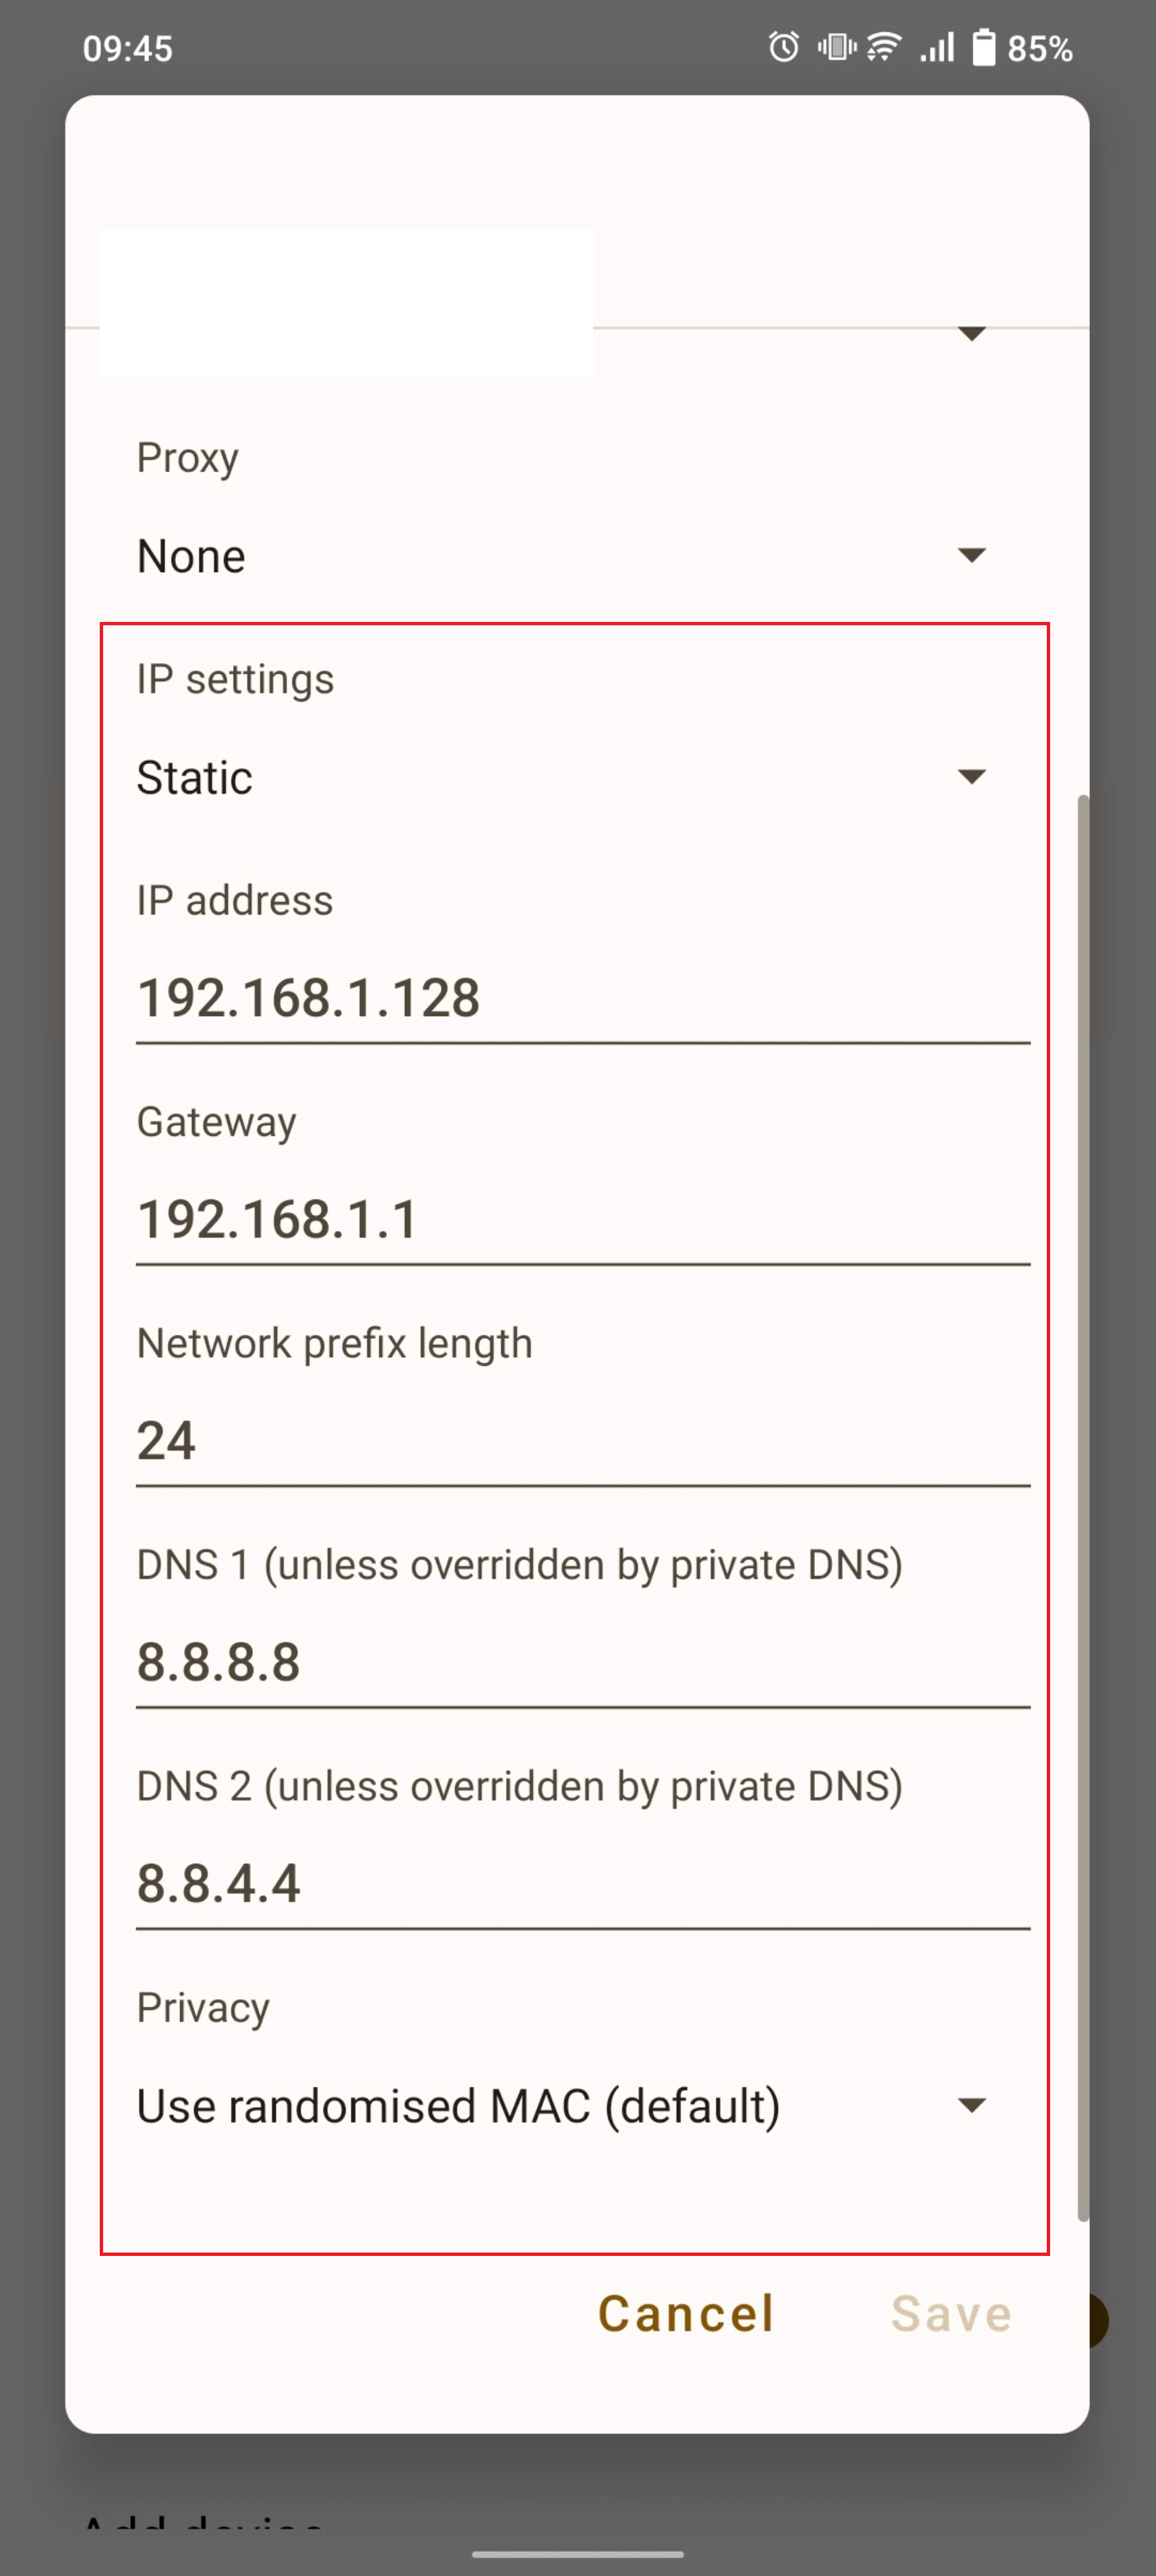
Here, you will enter your IP address, network prefix length, and two DNS. For DNS Google, enter 8.8.8.8 Go to DNS 1 and 8.8.4.4 Go to DNS 2, then click Save to complete.

>>> Check It Out:

3. How to change DNS on iPhone

Job Change DNS on iPhone Helps improve network access speed and security when using the internet. Below are specific instructions for How to change DNS on iPhone for new and old iOS versions, incl change Google DNS – one of the most popular DNS services today.

3.1 Change DNS on new IOS version phone 

To Change DNS on iPhone With the latest iOS versions, you just need to follow these steps:

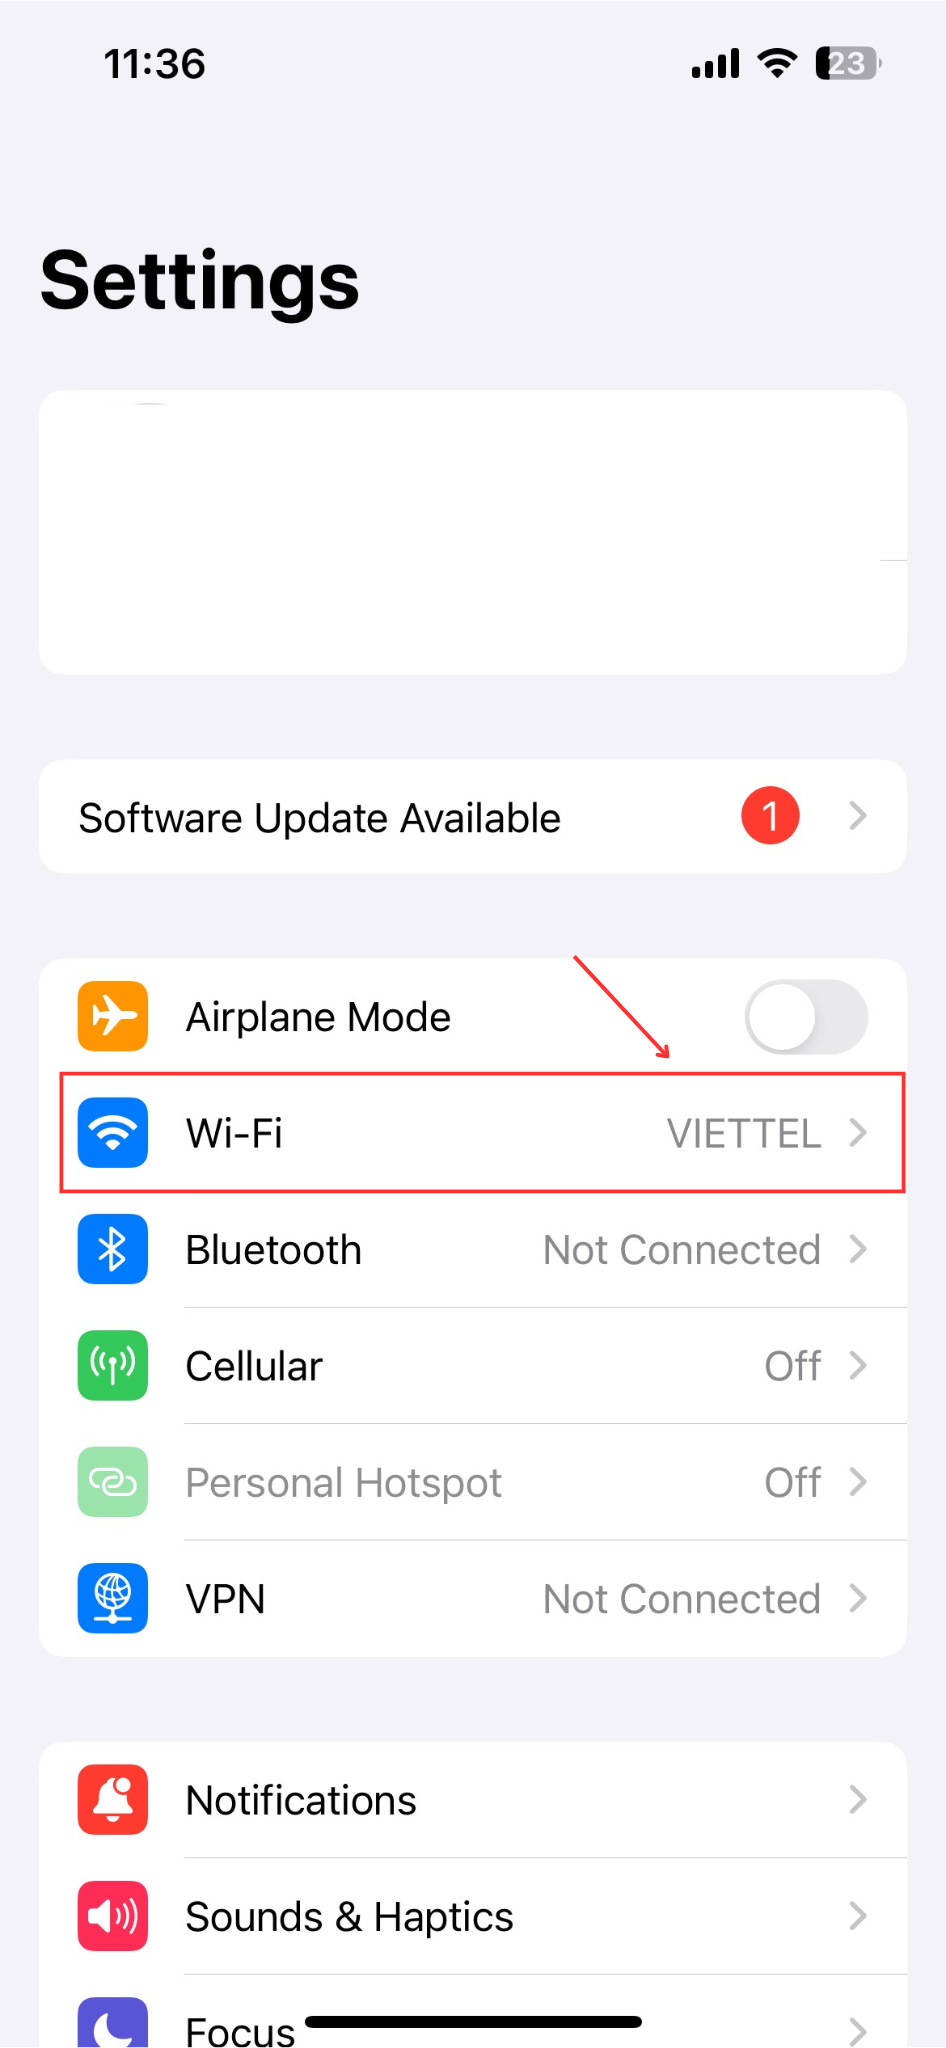
Step 1: Access Setting from main menu > select item Wifi to connect to the network.

How to change DNS
Go to Settings and start making changes

Step 2: In the right corner of the screen, click the "i" icon next to the Wifi network you are connecting to.

How to change DNS
Click the "i" icon next to the Wifi network you are connecting to

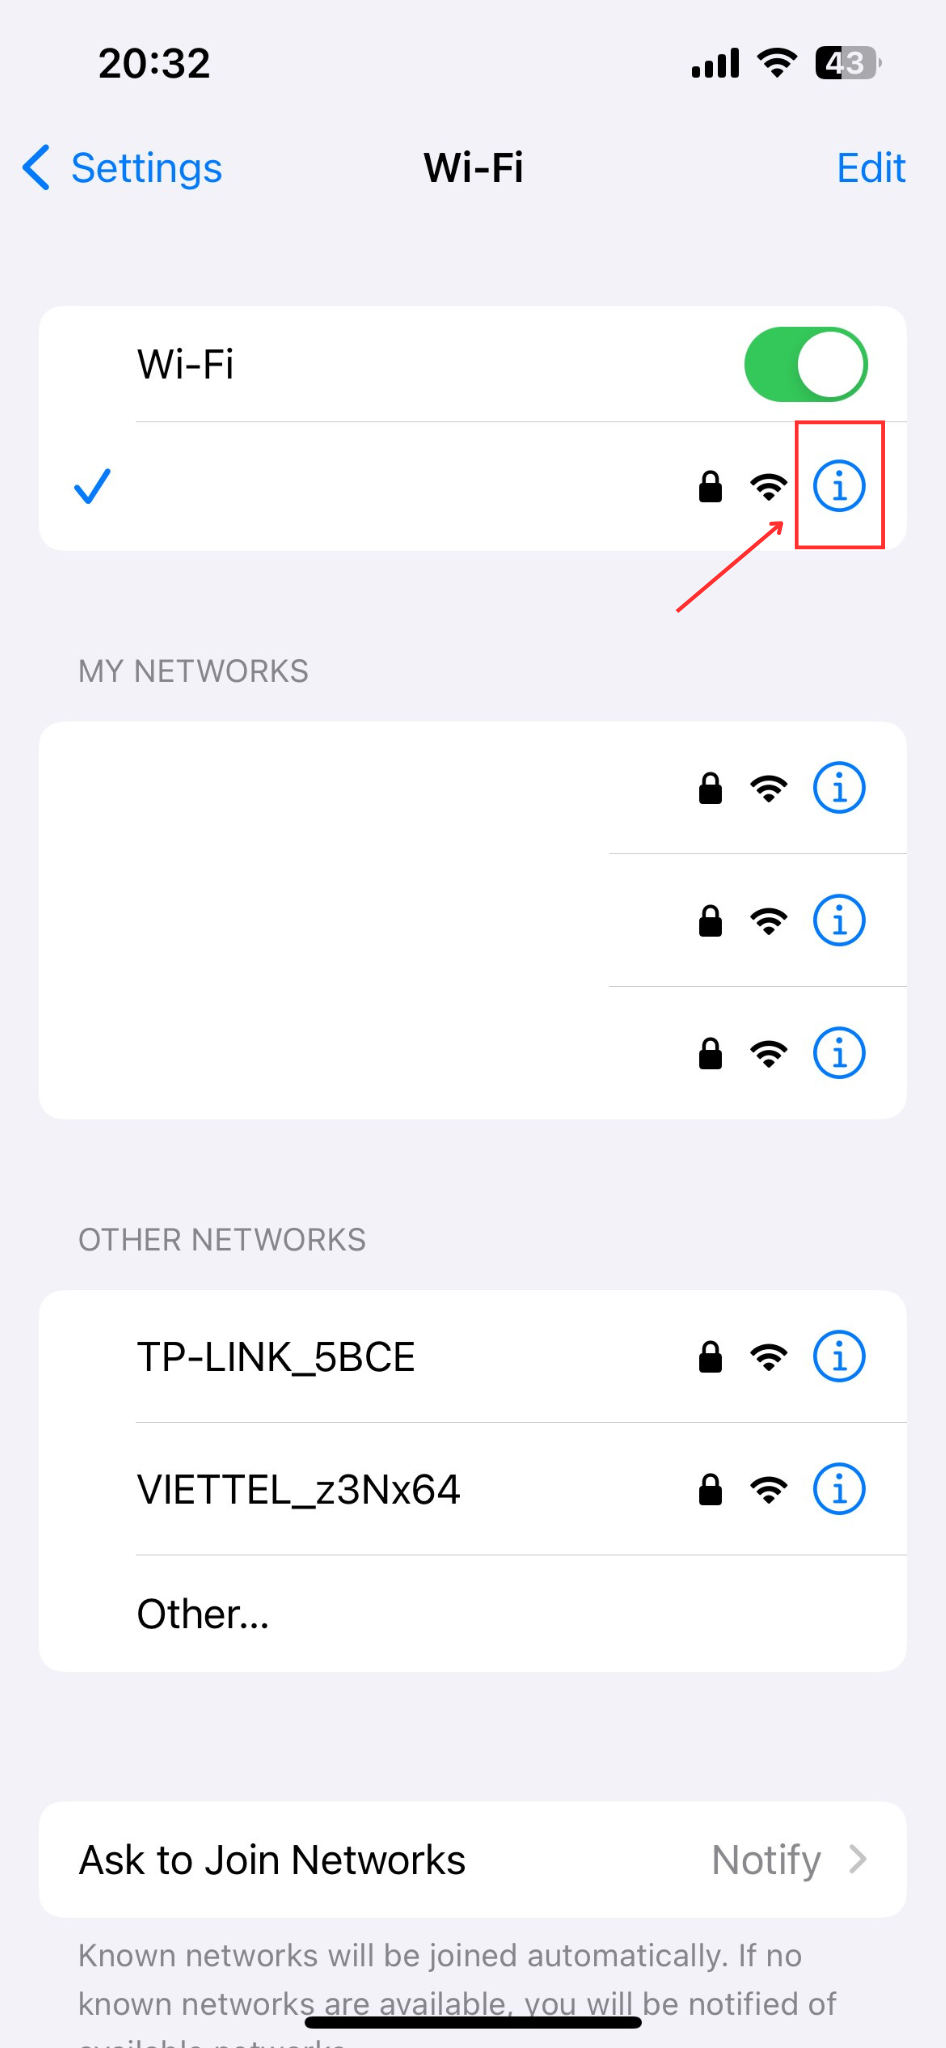
Step 3: Scroll to DNS > Configure DNS.

How to change DNS
Select Configure DNS

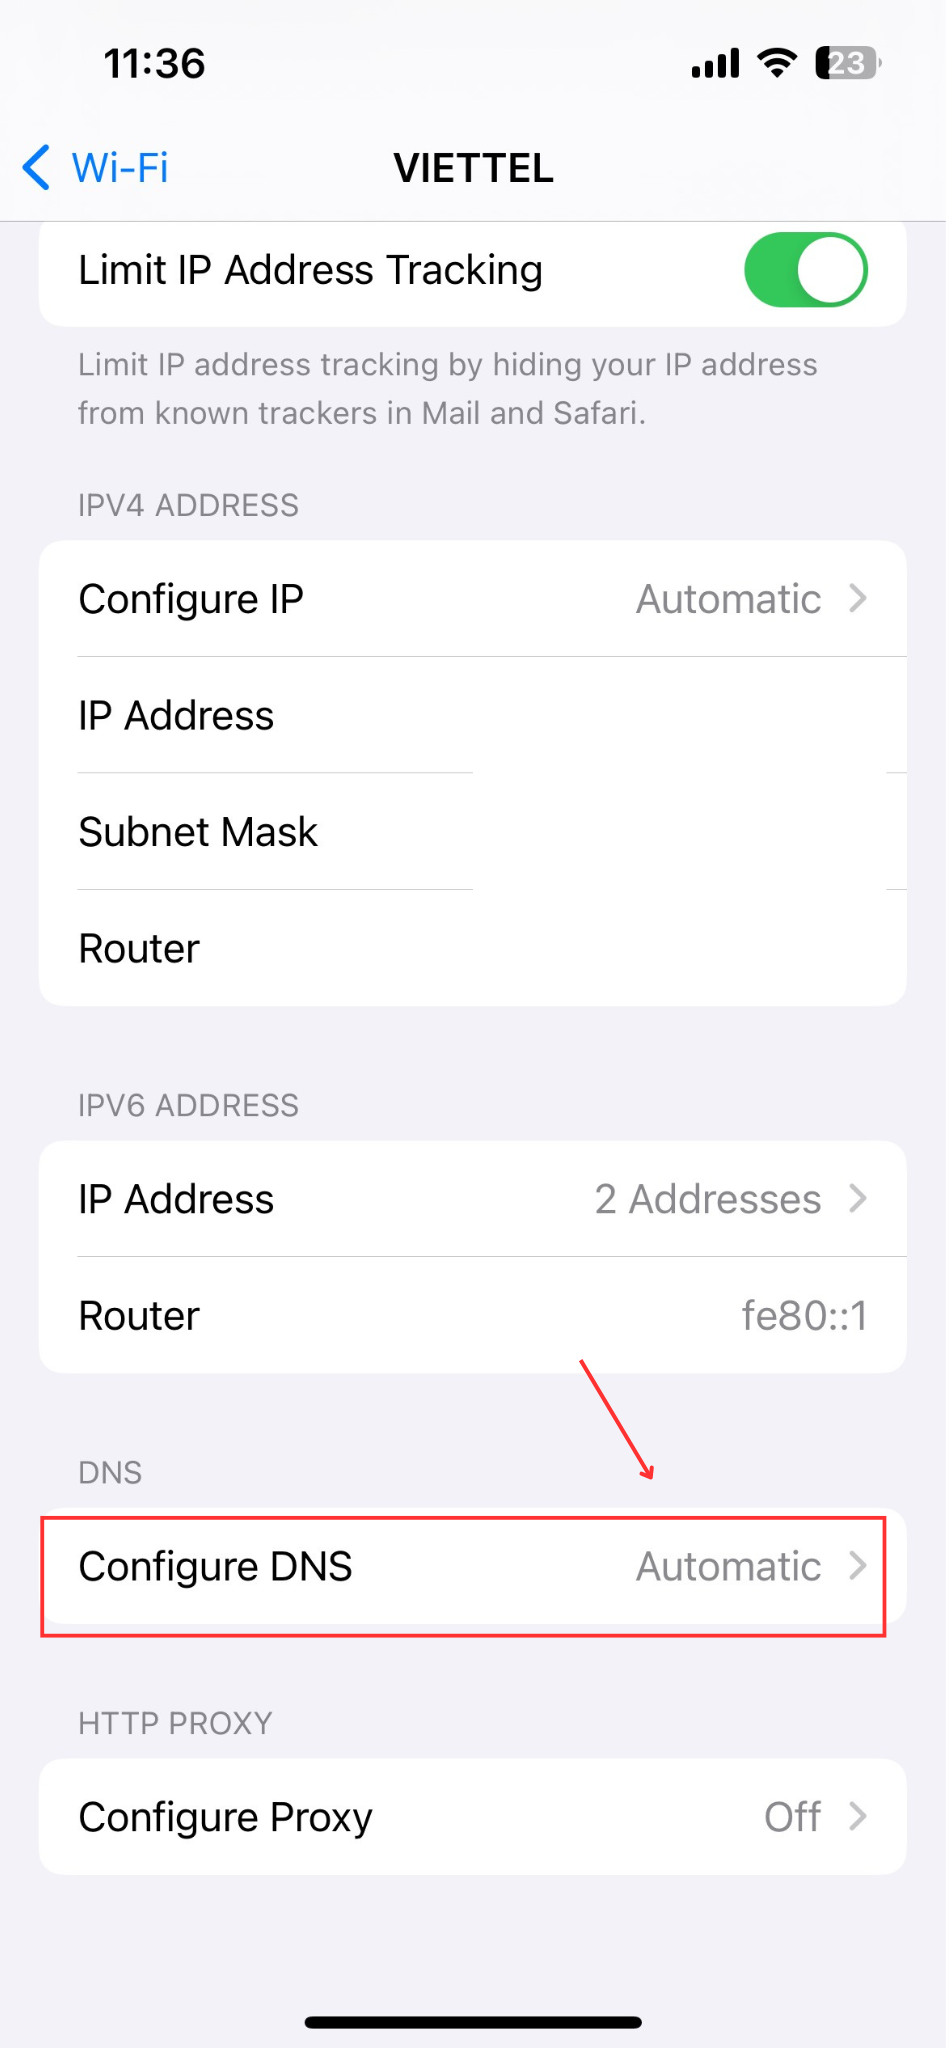
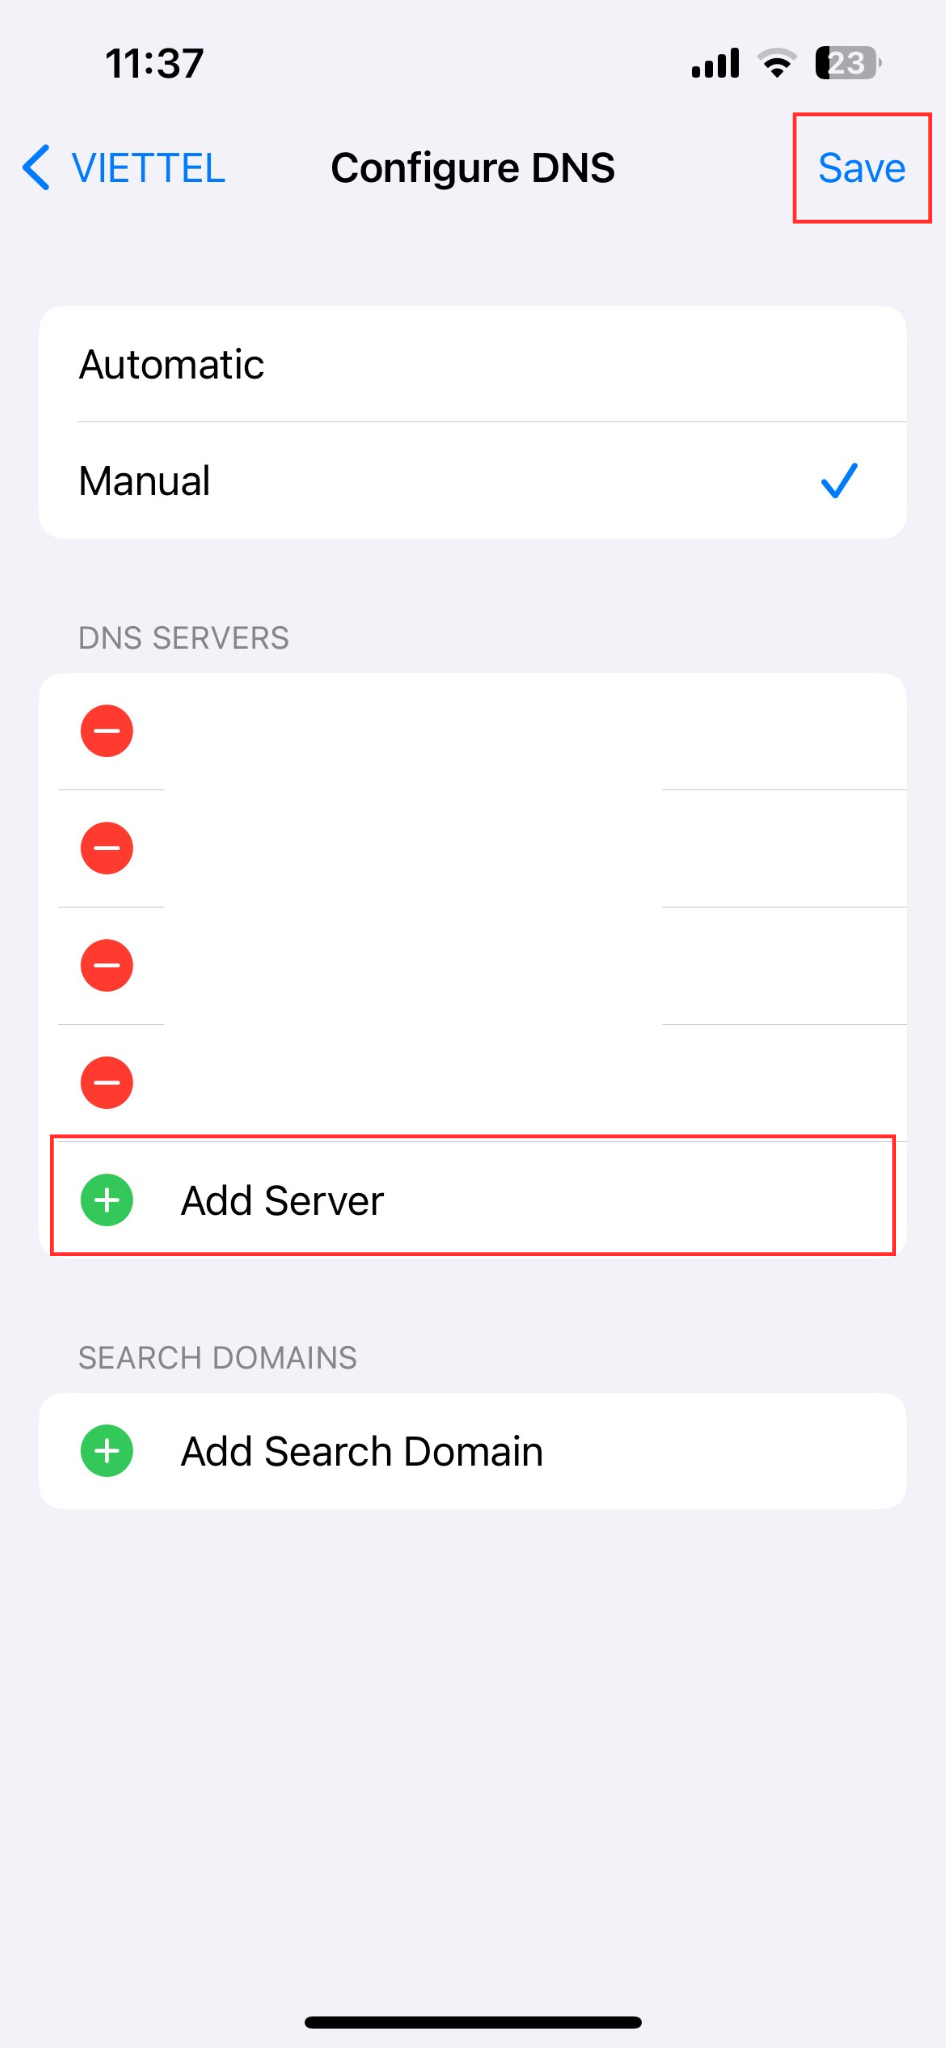
Step 4: Choose Manual > delete current DNS entries and add new ones by entering "8.8.8.8" and "8.8.4.4." Tap Save to complete.

How to change DNS
Enter DNS 8.8.8.8 and 8.8.4.4 from Google and click save to complete

>>> Learn More: Why Use 8.8.8.8 DNS? Improve Your Browsing with Google’s Public DNS

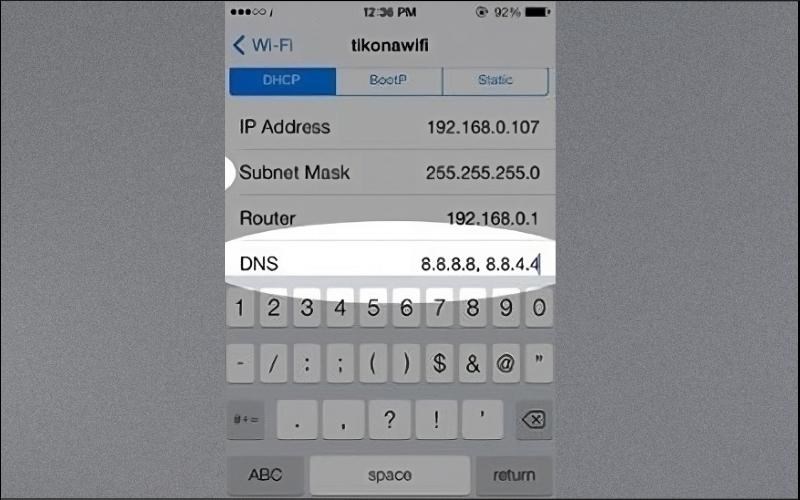
3.2 Change DNS on phones using old iOS versions

If you are using an older version of iOS and want to do it How to change DNS on iPhone, perform the steps below:

Step 1: Open Setting from main menu > select item Wifi to connect.

How to change DNS
Go to Settings and start making changes

Step 2: Tap the "i" icon next to the connected Wi-Fi network

How to change DNS
Click on the "i" icon in the right corner of the screen

Step 3: Scroll to DNS, delete existing DNS entries, and enter Google DNS: "8.8.8.8" and "8.8.4.4." Tap Save to finish.

How to change DNS
Enter Google's DNS as 8.8.8.8 and 8.8.4.4 to complete

In conclusion, knowing how to change DNS settings can significantly enhance your browsing speed and security. By following simple steps on Android or iOS, you can easily switch DNS servers to optimize your connection. For those interested in further privacy and security enhancements, using tools like Hidemyacc can also help manage your online presence and protect your digital footprint.

You May Also Like:

Read more

What is Err_Tunnel_Connection_Failed? Causes and solutions

What is Err_Tunnel_Connection_Failed? Causes and solutions

The err_tunnel_connection_failed error often appears when you browse the web using Chrome or other browsers. This error disrupts website access, causing frustration for users. The main causes are usually related to proxies, VPNs, or network settings. Fortunately, you can fix this error yourself in just a few minutes without needing an expert.  In this article, Hidemyacc will clearly explain what the err_tunnel_connection_failed error is, why it occurs, and the most effective ways to fix it. Read on to quickly resolve the issue and return to normal browsing.

logo Hidemyacc circle
Proxy Error 429: What it means and How to bypass "Too many requests"

Proxy Error 429: What it means and How to bypass "Too many requests"

Proxy error 429, labeled "Too many requests," is a server's way of telling you to back off. Whether you are managing hundreds of social media profiles or crawling high-authority websites, hitting a 429 error means your current strategy has been flagged for "spammy" behavior. In this guide, Hidemyacc will dive deep into why this happens and, more importantly, how professional users can bypass these limits using advanced proxy management and anti-detect techniques.

logo Hidemyacc circle
What is a proxy error? Causes and effective solutions

What is a proxy error? Causes and effective solutions

You’ve likely encountered a browser connection error at least once, even after carefully setting up your proxy. A proxy error is a frustrating barrier that can halt your workflow. This trouble can stem from incorrect computer configurations, a crashed intermediate server, or the website itself actively blocking access. In this article, let's explore a quick 5-step diagnostic process, criteria for choosing a reputable provider, and secrets to stable proxy operation using the Hidemyacc antidetect browser.

logo Hidemyacc circle
IP ban: 6+ ways to fix and effective anti-block tips

IP ban: 6+ ways to fix and effective anti-block tips

An IP ban is a form of access restriction implemented by a website server based on the Internet Protocol (IP) address. When a server detects abnormal behavior from an IP, it places that IP onto a blacklist. Once blacklisted, regardless of which account you use, as long as you exit through that IP "door," you will be blocked instantly.

logo Hidemyacc circle
How to fix the "Proxy server refused connection" error

How to fix the "Proxy server refused connection" error

Have you ever tried to access a website only to be blocked by a frustrating message stating that the Proxy Server Refused Connection? This error is a common hurdle for digital marketers, SEO specialists, and privacy-conscious users who rely on proxy networks to manage their online presence. Understanding why this happens and how to bypass it - is essential for maintaining a seamless workflow.

logo Hidemyacc circle