
Install static IP Windows 10. This is an important operation that helps you quickly identify and fix network problems. Especially, if you are administering a computer system at an office or agency, this becomes even more necessary. Together Hidemyacc Discover how to set a super fast and simple static IP through the article below!
1. What is static IP?
Static IP is an IP address configured by the user and maintained permanently, unchanged every time you start the computer, helping the network connection to be stable and easy to manage.
Typically, static IP address is used for purposes such as:
-
Helps users easily connect to network devices with private IP addresses, especially with older network applications with limited compatibility.
-
Can easily forward ports through the Router to devices on the same network. Because some Routers cannot forward ports with dynamic IP addresses.
-
Fix Wifi error "Limited Access."
-
Supports accessing data between computers on the same LAN easily.
2. How to set up static IP in Windows 10 super fast and easy
Below are detailed instructions on how to do it Install static IP Windows 10, reference right To apply:
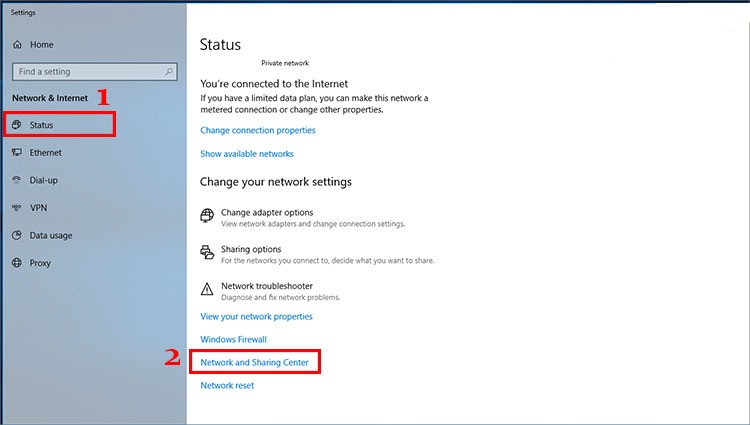
Step 1: Right click on the WiFi or LAN icon > select Open Network & Internet Settings.
Step 2: Select Status > click Network and Sharing Center.
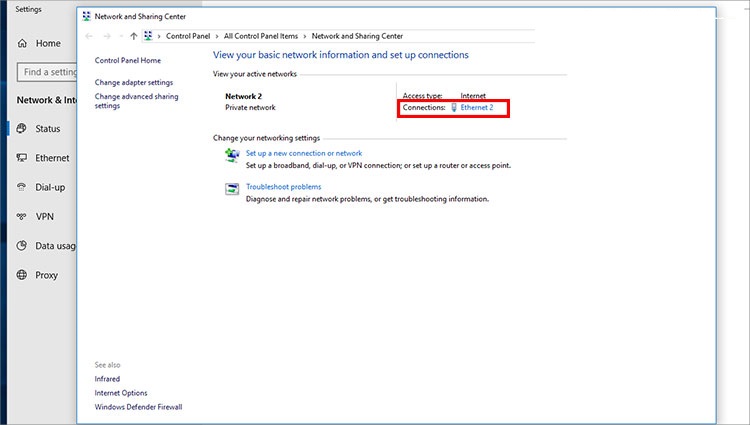
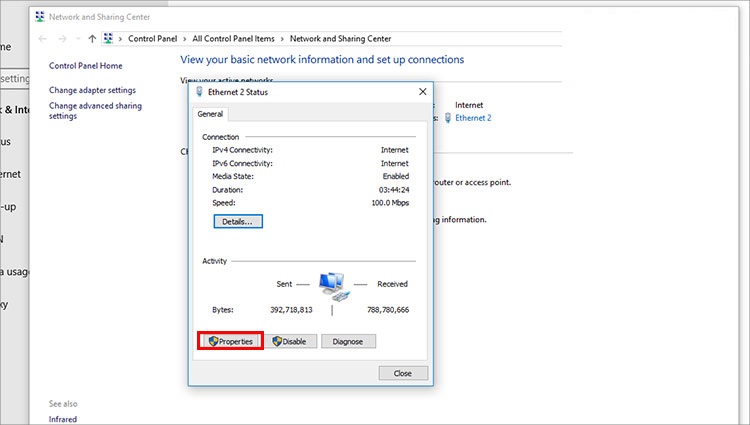
Step 3: Click on the name of the WiFi network or wired network you are connecting to in the Connections section > select Properties.
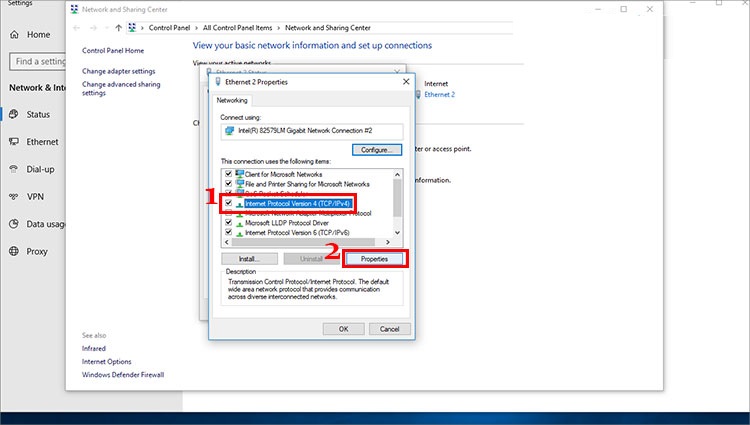
Step 4: Click Internet Protocol Version 4 (TCP/IPv4) > select Properties.
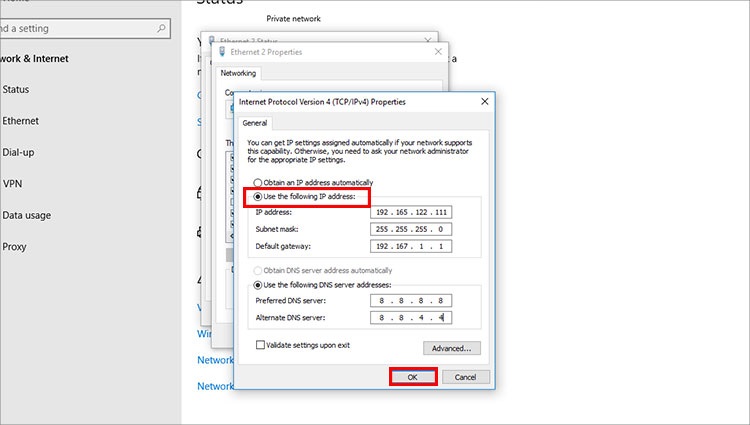
Step 5: Chọn Use the following IP address và Use the following DNS server address, then Install static IP Windows 10 as follows:
-
Default gateway: Enter your Gateway, usually "192.168.1.1".
-
Subnet mask: Enter "255.255.255.0".
-
IPv4 address: Enter the static IP address for the device. This address consists of 4 groups of numbers, separated by dots. The first three groups of numbers must match the Gateway, the fourth group can choose from 2 to 254, but must not match the IP of another device on the network.
-
Preferred DNS server and Alternate DNS server: Use Google's DNS, "8.8.8.8" and "8.8.4.4" respectively, or you can choose DNS from another provider.
>>> Further Reading: How do I change my IP address on my computer?
3. Note when setting static IP for Windows 10
To process Install static IP Windows 10 To be convenient and effective, you need to note the following things:
-
Operations Set static IP Windows 10 are all tied to the internal IP address in the LAN, different from the public IP provided by the network operator.
-
If you want to switch back to dynamic IP (default), just select Obtain an IP address automatically and Obtain DNS server address automatically.
4. Some other ways to set up static IP
Outside set static IP Windows 10, you can also set up static IP for some other tools and software. The setup is also extremely simple, specifically as follows:
4.1. How to set static IP for Router
Before going into the static IP settings for the Router, you need to make sure your computer is connected to the Wifi Router using an Ethernet cable or wireless connection. In addition, you also need to know the Router's IP address. Most Routers manufactured today use default addresses such as 192.168.0.1, 192.168.1.1 or 192.168.2.1. Here are the detailed installation steps:
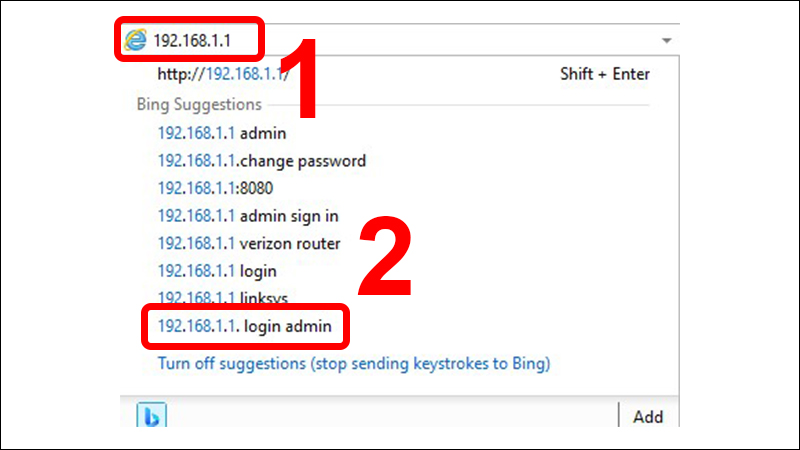
Step 1: Access Web browsers such as Microsoft Edge, Internet Explorer, Firefox or Chrome and send a connection request (log in as admin) to the Router via the browser's IP address.
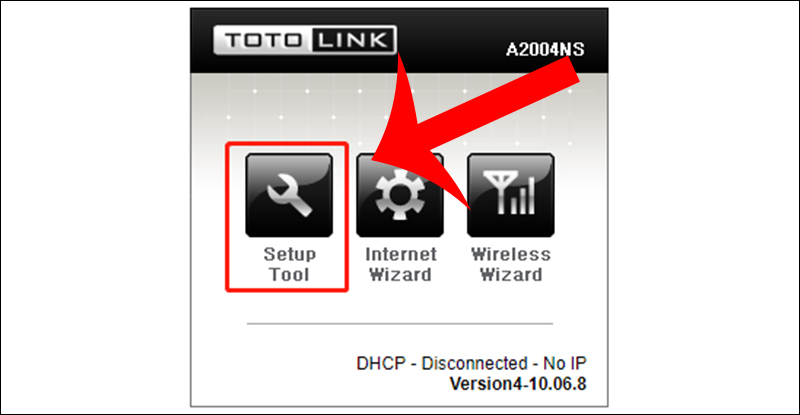
Step 2: Click the Setup Tool icon.
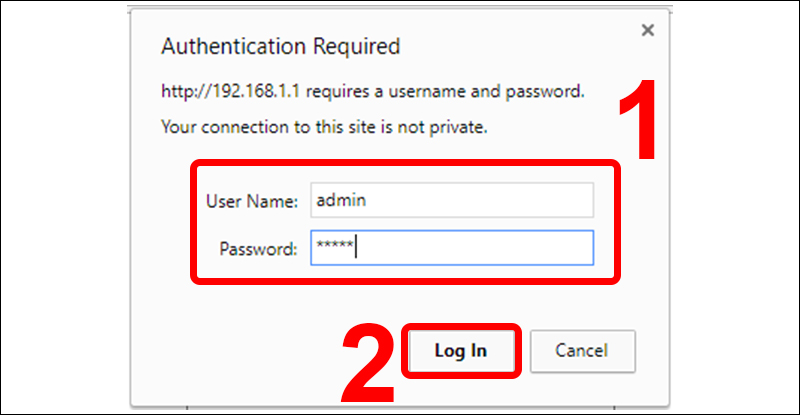
Step 3: Log in to the Web installation interface with admin rights.
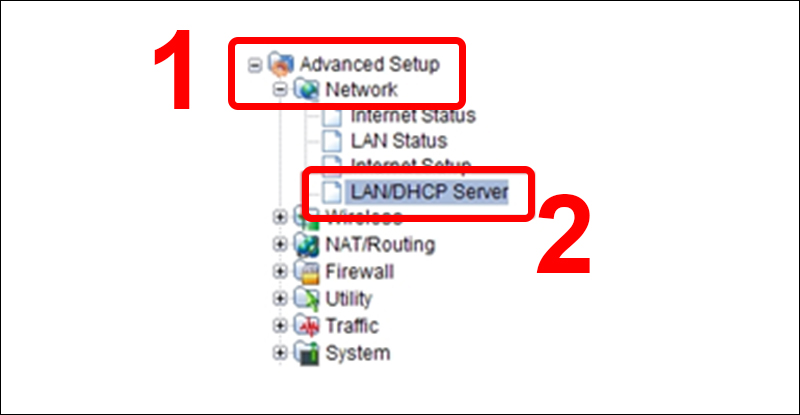
Step 4: In the left menu, select Advanced Setup > Network > LAN/DHCP Server.
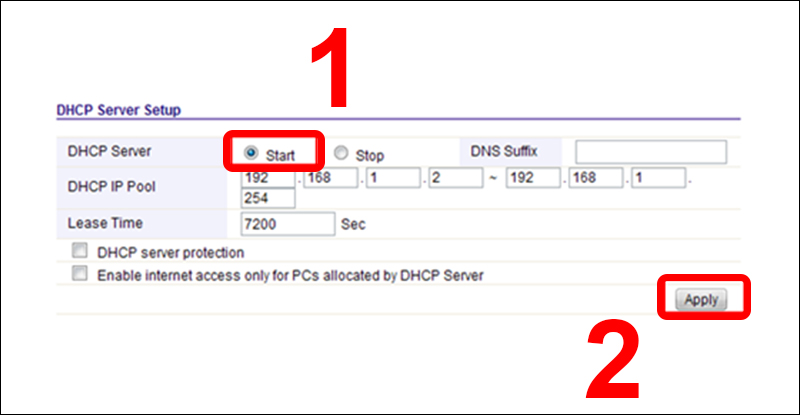
Step 5: Turn on DHCP by pressing Start, then select Apply.
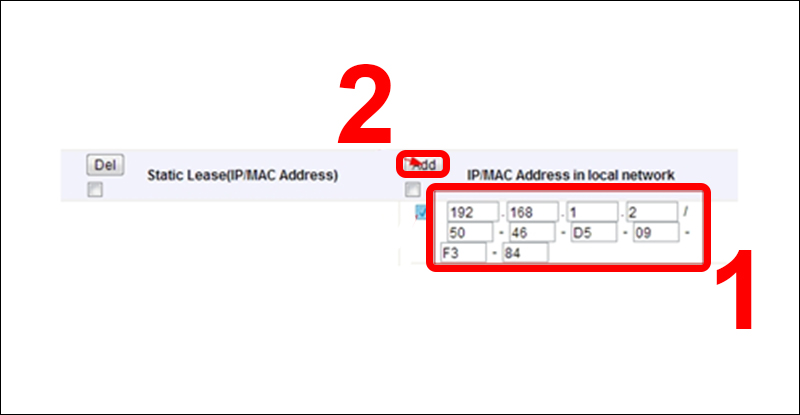
Step 6: Click on the IP address box, enter the specific IP address and select Add.
Step 7: Information about the IP/MAC address will be displayed on the left.
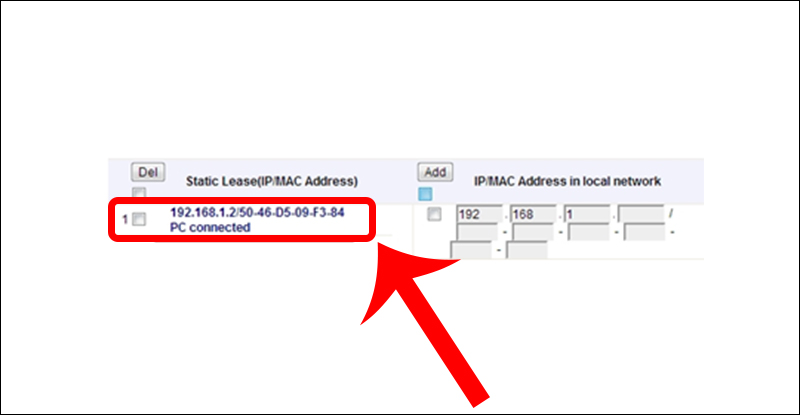
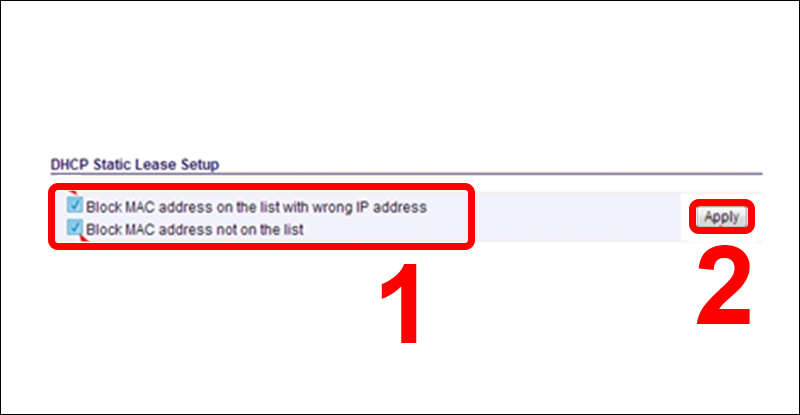
Step 8: Select the two options below and click Apply.
>>> Learn More: How can I change the IP address on my phone for better privacy and security?
4.2. Set up a static IP address in Windows Vista
Switching from dynamic IP (DHCP) to static IP address in Vista is similar to Windows 10 version, But The location will be a little different. You can follow these instructions:
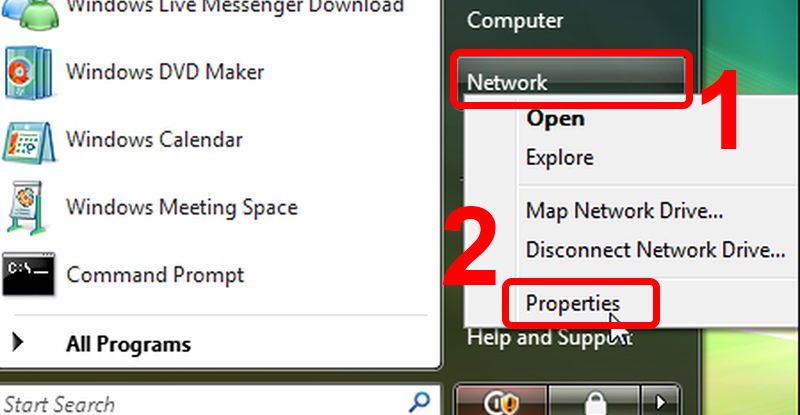
Step 1: Open the Start Menu, right-click Network and select Properties.
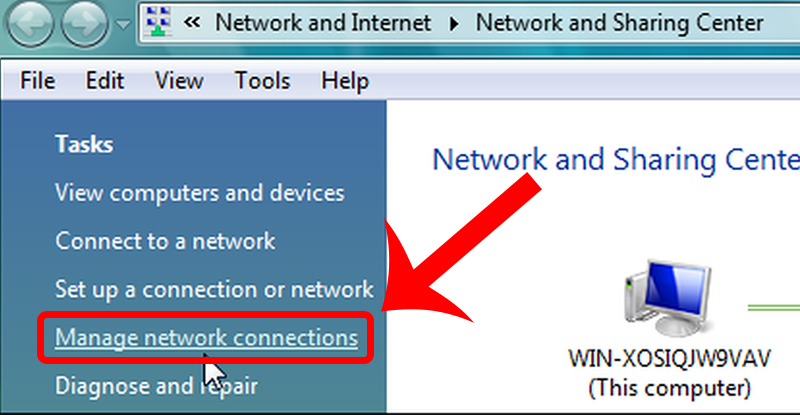
Step 2: In the Network and Sharing Center window, select Manage network connections.
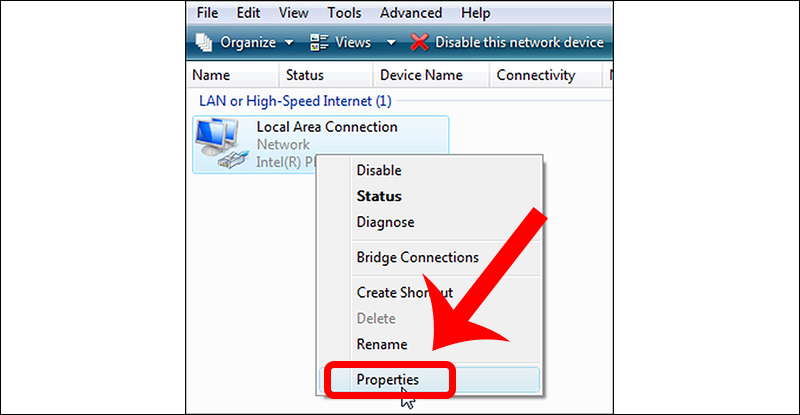
Step 3: Right-click the network adapter to which you want to assign an IP address, then select Properties.
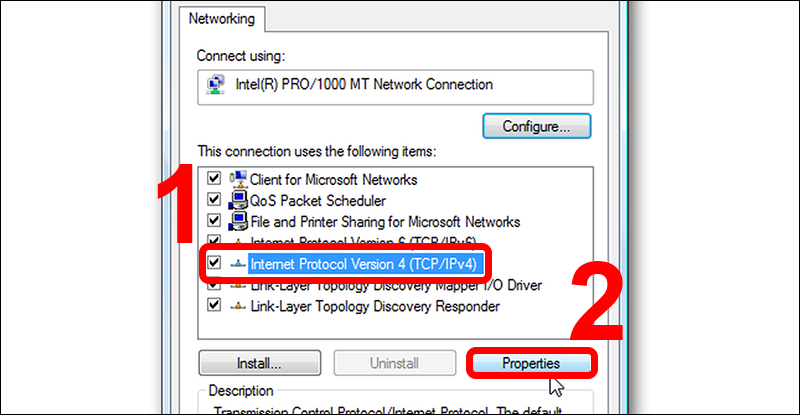
Step 4: Select Internet Protocol Version 4 (TCP/IPv4) and click Properties.
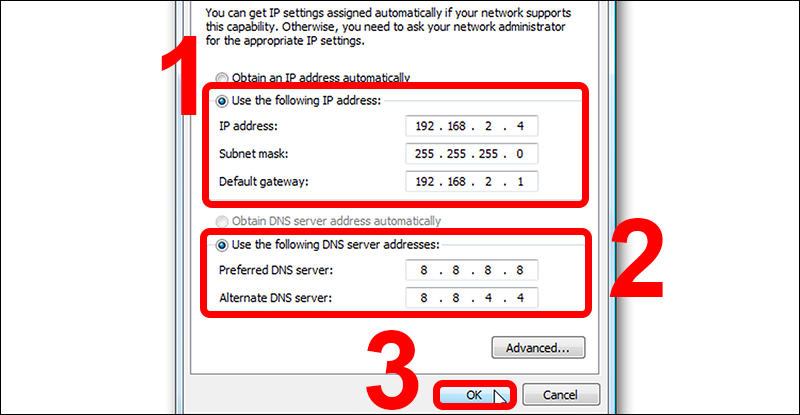
Step 5: Select Use the following IP address, then enter information in the IP address, Subnet mask and Default Gateway fields. Next, select Use the following DNS server addresses and enter information into Preferred DNS server and Alternate DNS server. Check Validate settings upon exit to have Windows check the new IP address, then click OK.
4.3. Set up static IP address in Windows 11
Here's how to set up a static IP for Windows 11:
Step 1: Press the Windows + I key combination to open the Settings menu.
Step 2: Select Network & Internet and click on the Wifi name or network you are using.
Step 3: Scroll down and select Edit next to IP assignment.
Step 4: In the new Edit IP settings dialog box, perform the following steps:
-
Select Manual from the drop-down menu.
-
Click the round button to enable IPv4.
-
Enter the same network information as on Win 10, then click Save to save the changes.
At this point, you probably have a clear understanding of the job Install static IP Windows 10 and other software. If you want to check the IP address, you can do this:
-
Press the Windows + R key combination, enter cmd and press Enter.
-
In the Command Prompt window, enter the command ipconfig and press Enter. Your computer's IP address will appear on the IPv4 Address line.
For those who make MMOs, IP addresses play an extremely important role. Therefore, to ensure accessibility to large websites such as Google, Facebook, Amazon, Ebay or Etsy…without being blocked, while enhancing security and convenience in managing multiple accounts, the best solution is to use Proxy with software. Hidemyacc.
With the support of Hidemyacc, You can create and manage multiple accounts at the same time. Software Hidemyacc helps hide original computer parameters and provides new information for each profile, allowing you to access the Internet with multiple accounts without being detected. Besides, Hidemyacc There are also many other superior features such as Proxy management, Cookie management, bookmarks and extensions, Magic Link, automation… Try it out Hidemyacc 7 days free today!
So, the above article has shared with you how Install static IP Windows 10 in a simple and detailed way. Wishing you success. If you have any concerns, please contact us immediately Hidemyacc for answers!
>>>You May Also Like:
- Troubleshooting Internet Issues? Learn how to disable proxy
- What is rotating IP address proxy? Top providers for rotating proxy
- Proxy Server: What is it and how does it work?