Changing DNS settings in Windows 10 can improve browsing speed, reduce page load times, and enhance privacy. By following a simple process to update DNS configurations, users can optimize network performance and increase security. In this article, antidetect browser Hidemyacc provides a detailed guide to assist you in effectively changing DNS settings on Windows 10, ensuring a smoother and safer internet experience.
1. Changing DNS settings in windows 10 - when you need it?
There are many specific situations where you should consider changing DNS setting in window 10 to improve your Internet experience. Here are some main reasons:
- Increase web browsing speed: Some DNS servers have faster processing capabilities than the default DNS of the internet service provider (ISP). Changing to Google or Cloudflare DNS may help Improve connection speed and reduce page load times, especially when the current DNS is overloaded or not optimal.
- Protect your privacy: When using your ISP's DNS, all your web browsing activities can be tracked. Change DNS setting on windows 10 switching to DNS services that do not store access history will help you better secure your personal information.
- Bypass content blocking: Some websites may be blocked by the provider's DNS according to government requirements. Switching to international DNS allows you Access to restricted content without using complicated tools.
- Troubleshoot network problems: Sometimes, connection problems can be caused by an overloaded or malfunctioning DNS server. Change DNS Windows 10 is a quick and effective way to solve this problem.

Overall, work change DNS not only helps increase network speed but also protects privacy and overcomes access limits. Let's explore the steps How to change DNS Windows 10 details in the next section.
>>> Learn More: Google Public DNS Server: What It Is and How to Configure It for Faster Internet
2. How to change DNS setting on windows 10 in detail to help increase network speed
Change DNS on Windows 10 not only helps improve Internet connection speed but also enhances access to blocked websites. Below are detailed instructions on how to change DNS setting on Windows 10 through two methods: using Settings and through Control Panel.
2.1. How to change DNS in Windows 10 in Settings
To change DNS through Settings, follow these steps:
Step 1: Open network settings
Press Windows key + I or click the Start Menu icon and select "Settings". In the Settings window, find and select "Network & Internet".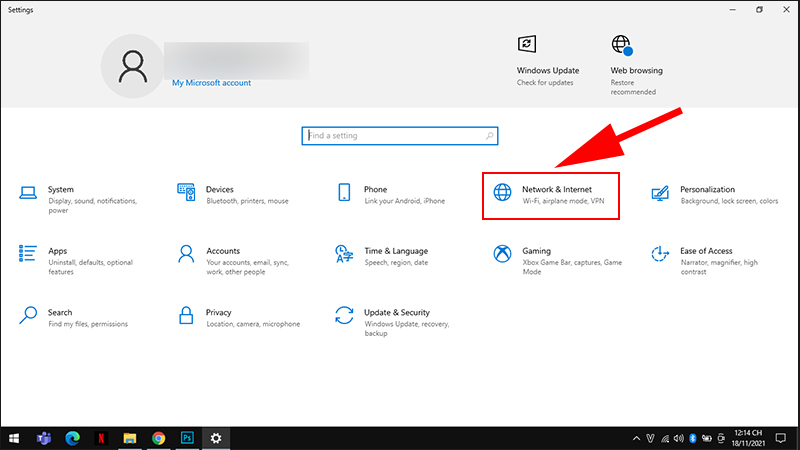
Step 2: Choose a network connection
Select Wi-Fi or Ethernet from the menu on the left, depending on the connection you're using. Click the button "Properties" under current connection.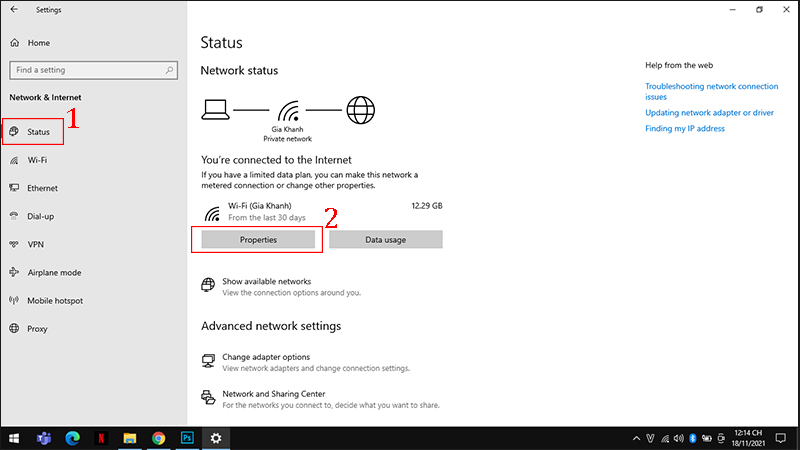
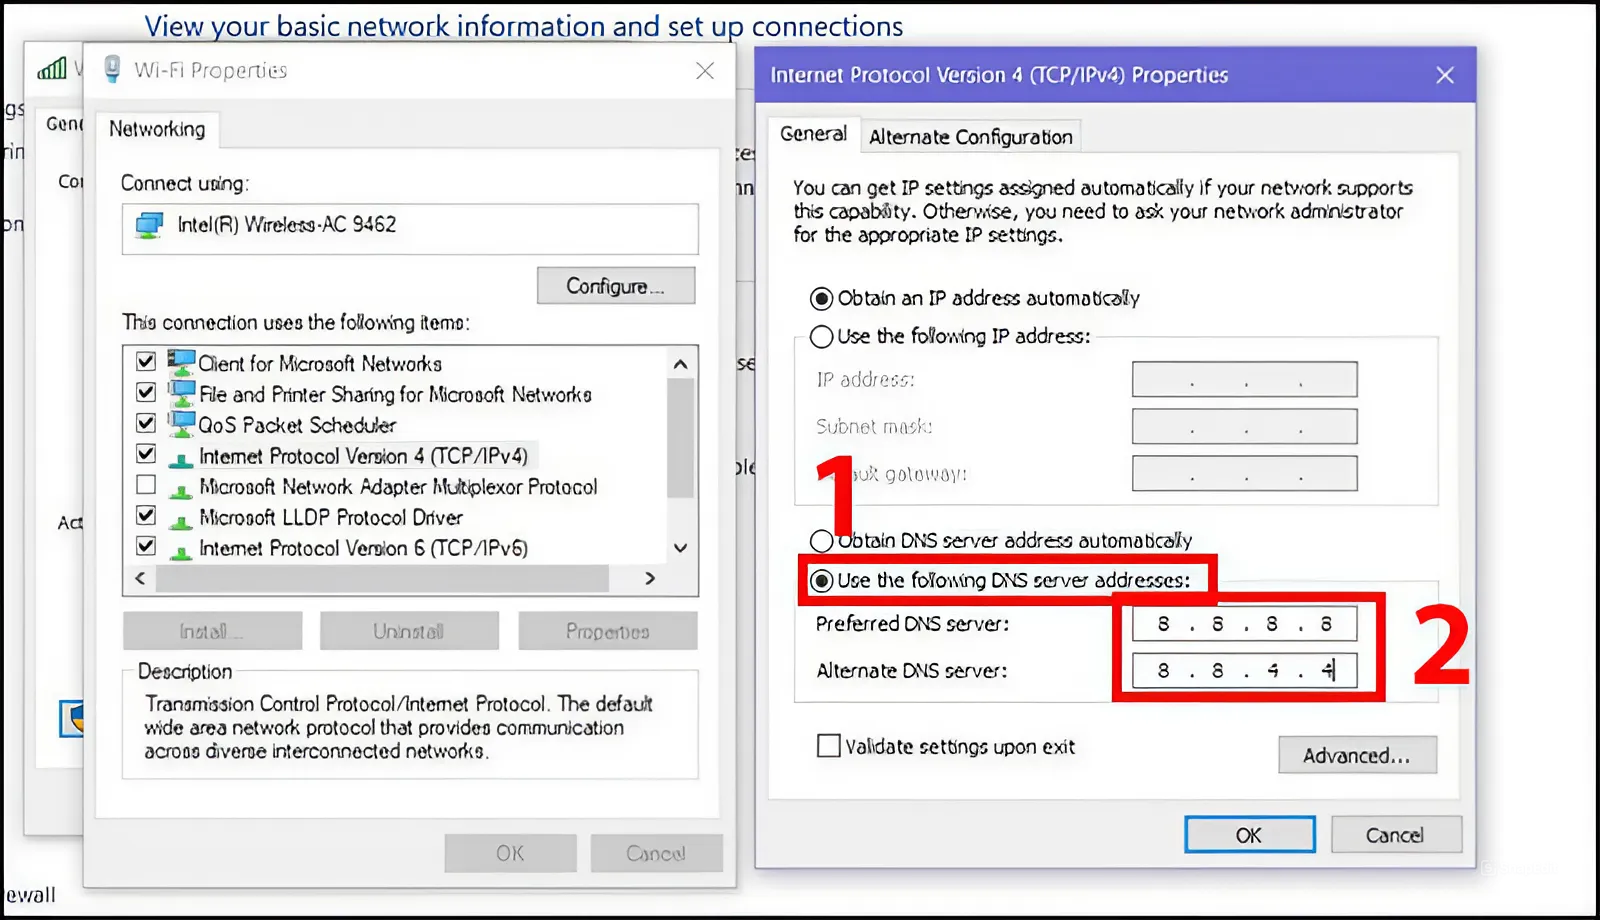
Step 3: Edit IP settings
Scroll down and find the section "IP settings". Press "Edit", then switch from mode "Automatic (DHCP)" sang "Manual".Step 4: Enter the new DNS address
Turn on the IPv4 switch and enter the new DNS address in the box "Preferred DNS" and "Alternate DNS". For example:-
Google DNS: 8.8.8.8 and 8.8.4.4
-
Cloudflare DNS: 1.1.1.1 and 1.0.0.1
Click "Save" to save changes.

Step 5: Restart the computer
Restart the computer to apply the changes.Step 6: Test the new DNS
After reboot, check if DNS has been updated successfully.>>> Check It Out: Why Use 8.8.8.8 DNS? Improve Your Browsing with Google’s Public DNS
2.2. How to change DNS for Windows 10 in Control Panel
If you want to change DNS through Control Panel, follow these steps:
Step 1: Open the network and sharing center
Right click on the network icon in the right corner of the screen and select "Open network & sharing center".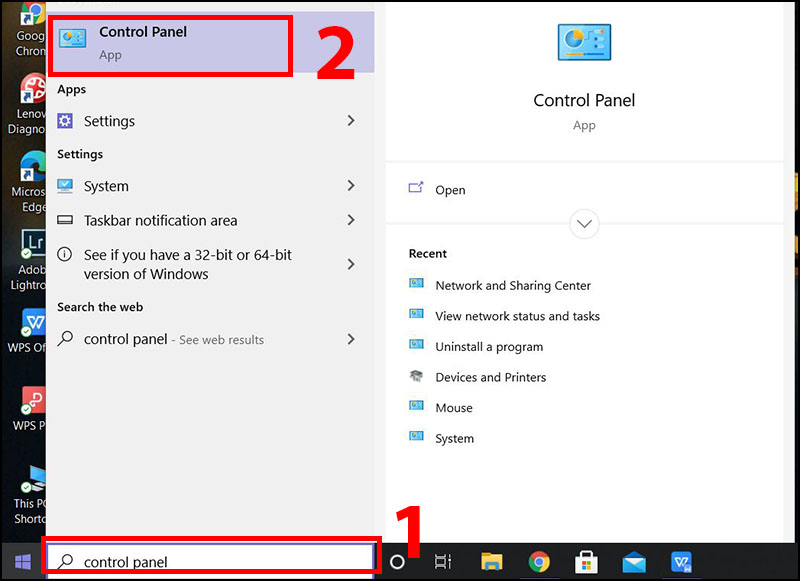
Step 2: Access properties
In the window "Open network & sharing center", press "Change Adapter Settings". Right click on the network icon you are using and select "Properties".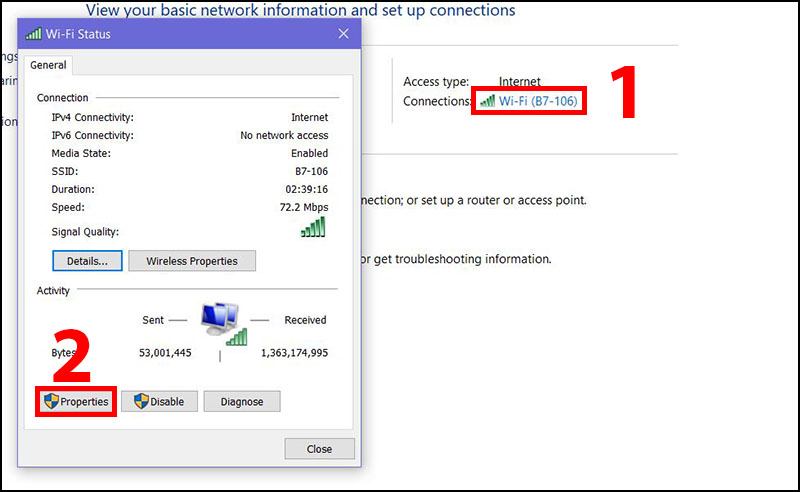
Step 3: Change DNS address
In the window "Wi-Fi Properties", select "Internet Protocol Version 4 (TCP/IPv4)" and press "Properties". Select the cell "Use the following IP address" and fill in the DNS information that needs to be changed. Some common DNS ranges include:-
OpenDNS: 208.67.220.220 and 208.67.222.222
-
Google DNS: 8.8.8.8 and 8.8.4.4
-
DNS.Watch: 84.200.69.80 and 84.200.70.40
-
VeriSign Public DNS: 64.6.64.6 and 64.6.65.6
If you want to use Google DNS, enter:
-
Preferred DNS server: 8.8.8.8
-
Alternate DNS: 8.8.4.4
Press "OK" to complete.
By following the steps above, you will easily change DNS on Windows 10.
3. Some high-speed DNS are popular today
Changing DNS addresses is an effective method to improve internet access, especially for restricted websites. Below is a list of high-speed, free DNS that is popular with many users:
1 - DNS Google
-
IPv4: Preferred DNS server: 8.8.8.8 / Alternate DNS: 8.8.4.4
-
IPv6: Preferred DNS server: 2001:4860:4860::8888 / Alternate DNS: 2001:4860:4860::8844
2 - DNS VNPT
-
Preferred DNS server: 203.162.4.191
-
Alternate DNS: 203.162.4.190
3 - DNS Viettel
-
Preferred DNS server: 203.113.131.1
-
Alternate DNS: 203.113.131.2
4 - DNS FPT
-
Preferred DNS server: 210.245.24.20
-
Alternate DNS: 210.245.24.22
5 - DNS OpenDNS
-
Preferred DNS server: 208.67.222.222
-
Alternate DNS: 208.67.220.220
6 - DNS Cloudflare
-
IPv4: Preferred DNS server: 1.1.1.1 / Alternate DNS: 1.0.0.1
-
IPv6: Preferred DNS server: 2606:4700:4700::1111 / Alternate DNS: 2606:4700:4700::1001
7 - DNS Norton
-
Preferred DNS server: 198.153.192.1
-
Alternate DNS: 198.153.194.15
8 - DNS Dnsadvantage
-
Preferred DNS server: 156.154.70.1
-
Alternate DNS: 156.154.71.1
9 - DNS NetNam
-
203.162.7.89
-
203.162.6.71
-
203.162.0.181
-
203.162.0.24
-
203.162.22.2
-
203.162.7.131
-
203.162.21.114
-
203.162.7.89
-
203.162.7.71
10 - DNS VNNIC
-
203.162.57.105
-
203.162.57.107
-
203.162.57.108
11 - DNS Hi-Teck
-
209.126.152.184
-
216.98.138.163
-
209.126.152.185
12 - DNS Verizon
-
4.2.2.1
-
4.2.2.2
-
4.2.2.3
-
4.2.2.4
-
4.2.2.5
-
4.2.2.6

4. Alternative solution to changing DNS setting on window 10
When looking for ways to optimize network connections, many people think about changing DNS. However, changing DNS only helps increase page loading speed and cannot change Browser Fingerprint parameters. Therefore, for MMO creators, when they have to create and manage multiple accounts, they can still be tracked by the website.
If you want to increase access speed and improve security, users should prioritize using a proxy combined with an Antidetect Browser tool like Hidemyacc. Using Hidemyacc not only gives you perfect anonymity but also provides high security and flexibility. With Browser Fingerprint masking, you can create a new identity for each account. This is very important in managing multiple accounts without being suspected or detected by websites.
Additionally, Hidemyacc features proxy integration, making it easy for you to change your IP address and access websites more smoothly without limitations.
Changing DNS settings on Windows 10 can enhance your browsing experience by improving speed and enabling access to restricted sites. By following the guide above, you can quickly configure DNS settings for better performance and security. Experiment with trusted DNS options to find what suits your needs best. For more advanced tools and privacy features, consider exploring additional solutions like Hidemyacc.
Other Relevant Articles: