Learn how to change DNS on Windows and Mac with this complete guide. Changing your DNS settings can help improve your internet speed, security, and privacy. Whether you're looking for faster browsing or to protect your personal data, this step-by-step tutorial will walk you through the process for both platforms. Let Hidemyacc guide you through the steps in this article.
1. Benefits of changing DNS
Before going into the details of changing DNS, it’s essential to understand the benefits it brings. DNS not only directs web access requests but also affects internet connection stability.

By switching the default DNS to reputable services, you can gain several key advantages, such as:
- DNS service stability reduces connection issues to website IP addresses, improving access speed.
- DNS services enable access to more websites, avoiding network congestion or restricted access.
>>> Learn More: 1.1.1.1 DNS: What Is It and How Can It Improve Your Internet Speed and Privacy?
2. List of Free and Secure DNS Addresses
Many free DNS services today offer stable performance and high security. These services not only boost speed but also support access to blocked websites. Here’s a list of reliable free DNS services you may consider:
|
DNS provider |
Primary DNS |
Secondary DNS |
|
Cloudflare |
1.1.1.1 |
1.0.0.1 |
|
Google Public DNS |
8.8.8.8 |
8.8.4.4 |
|
OpenDNS |
208.67.222.222 |
208.67.220.220 |
|
NordVPN |
103.86.96.100 |
103.86.99.100 |
|
NordVPN SmartDNS |
103.86.96.103 |
103.86.99.103 |
|
Quad9 |
9.9.9.9 |
149.112.112.112 |
|
AdGuard DNS |
94.140.14.14 |
94.140.15.15 |
|
CleanBrowsing |
185.228.168.9 |
185.228.169.9 |
|
Alternate DNS |
76.76.19.19 |
76.223.122.150 |
3. How to Change DNS on Windows 10, 11
For Windows 10 and 11 users, changing DNS can improve browsing speed and increase security. Although straightforward, the steps should be done carefully to ensure optimal results.
3.1. Change DNS using Control Panel
How to change DNS done using Control Panel as follows:
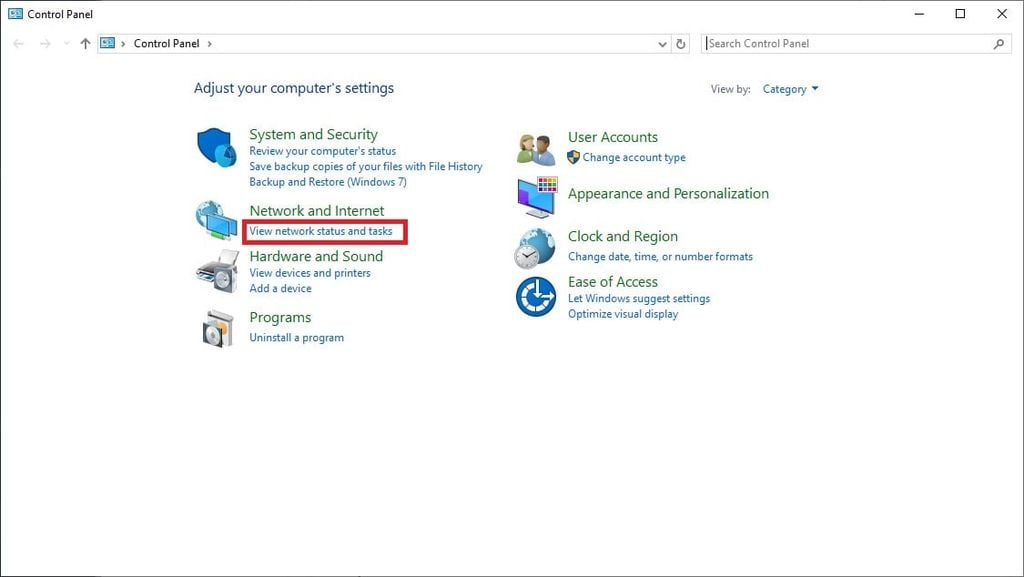
Step 1: Open Control Panel, then find and select the item Network and Internet, next click options View network status and tasks.
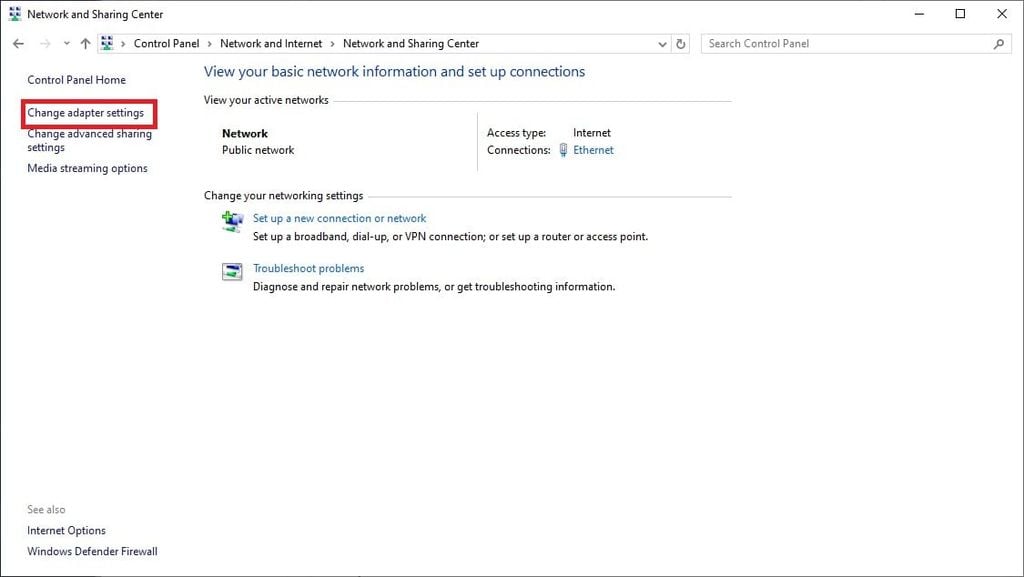
Step 2: In the left menu, click Change adapter settings.
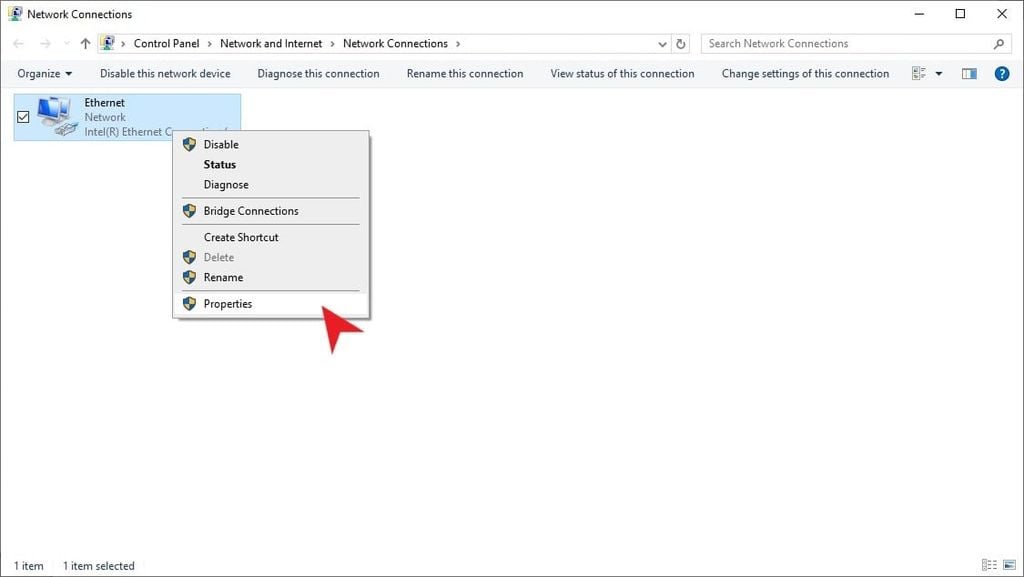
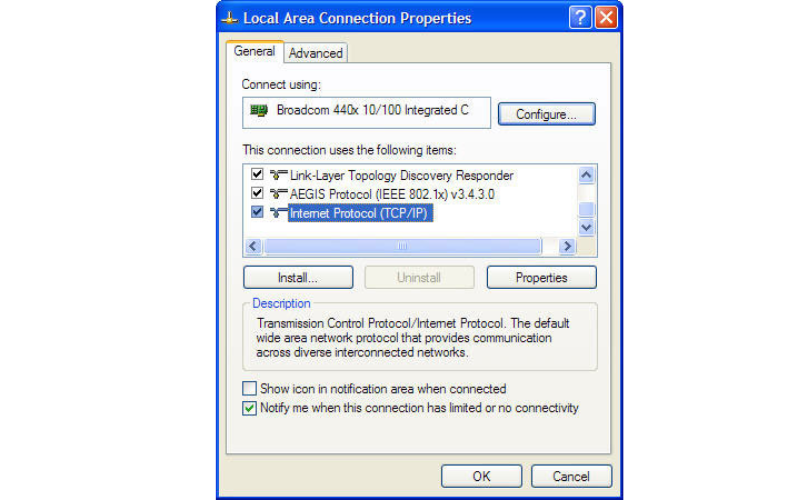
Step 3: When the window Network Connections appears, find connection Ethernet, then right-click and select Properties.
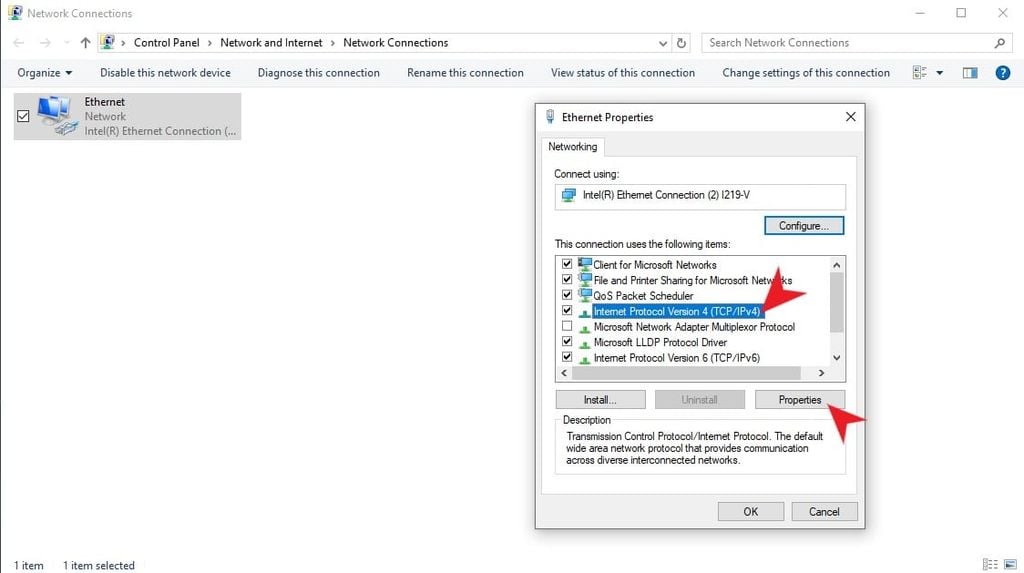
Step 4: Select Internet Protocol Version 4 (TCP/IPv4), then click Properties.
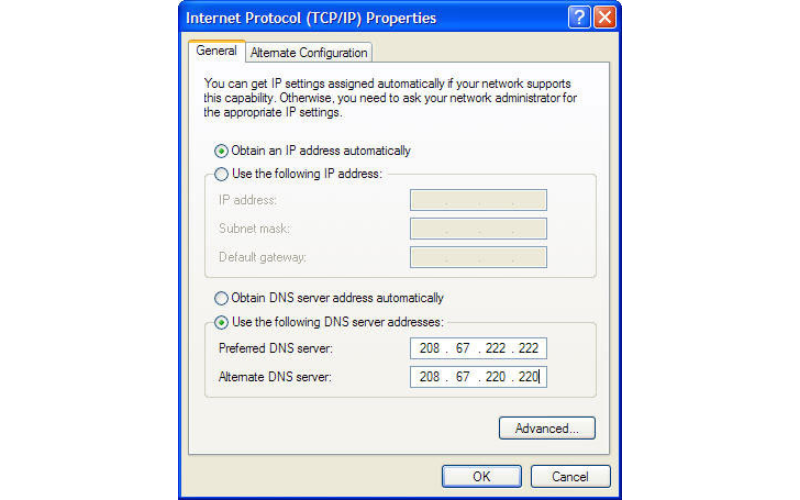
Step 5: Check the option Use the following DNS server addresses to get started change DNS, then enter the desired DNS addresses.
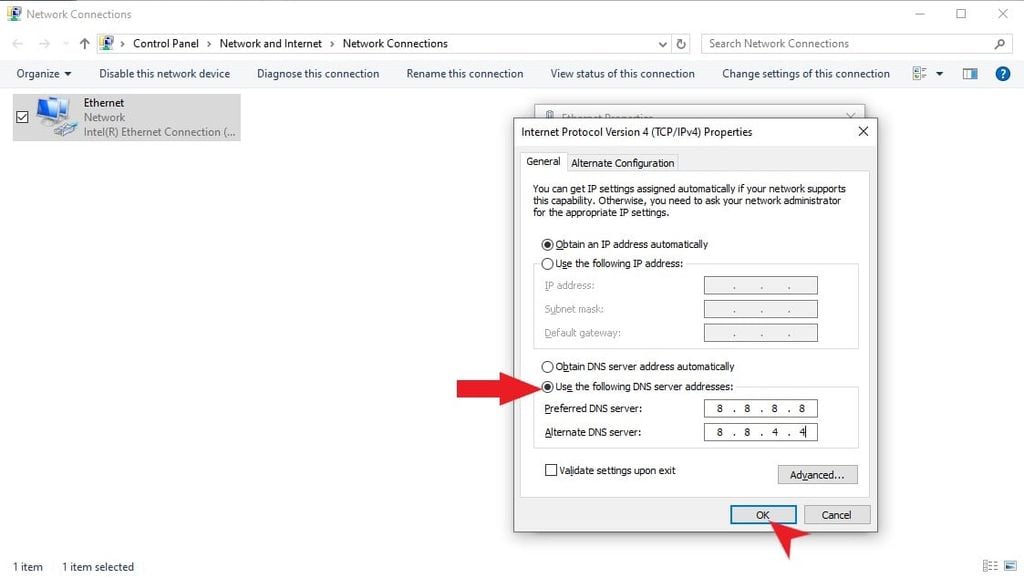
Step 6: Enter information for two items Preferred DNS server và Alternate DNS server. These addresses can be obtained from DNS services such as Cloudflare, change Google DNS or OpenDNS. Please fill in the numbers in order in each corresponding line in the DNS address list.
Step 7: Press OK to save How to change DNS on computer.
Step 8: Restart your computer or laptop to apply the new settings.
>>> Check It Out: Troubleshooting DNS_PROBE_FINISHED_NXDOMAIN on Mobile Devices
3.2. Change DNS in Settings
Change DNS Win 10, change DNS Win 11 In Settings, it's also simple with these steps:
Step 1: Open Settings in one of two ways:
-
Click the cog icon in the menu Start.
-
Use key combinations Windows + I.
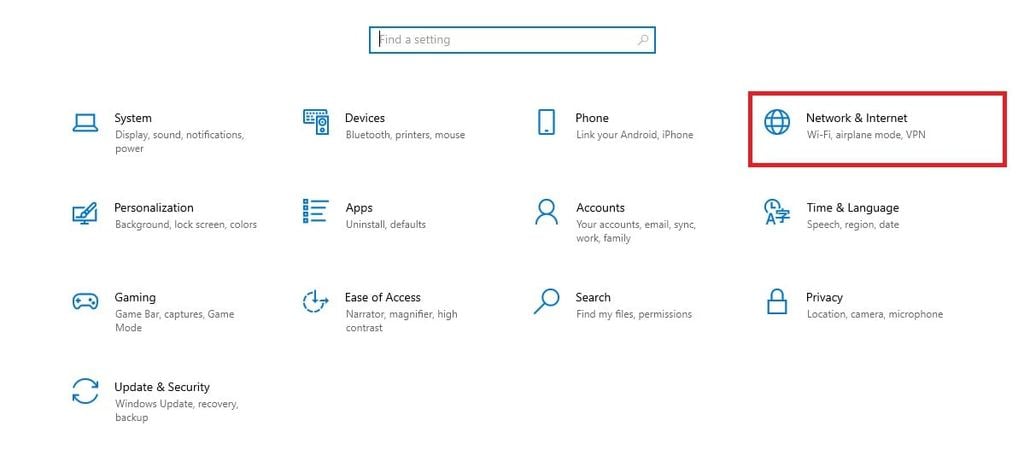
Step 2: Find and select the item Network & Internet.
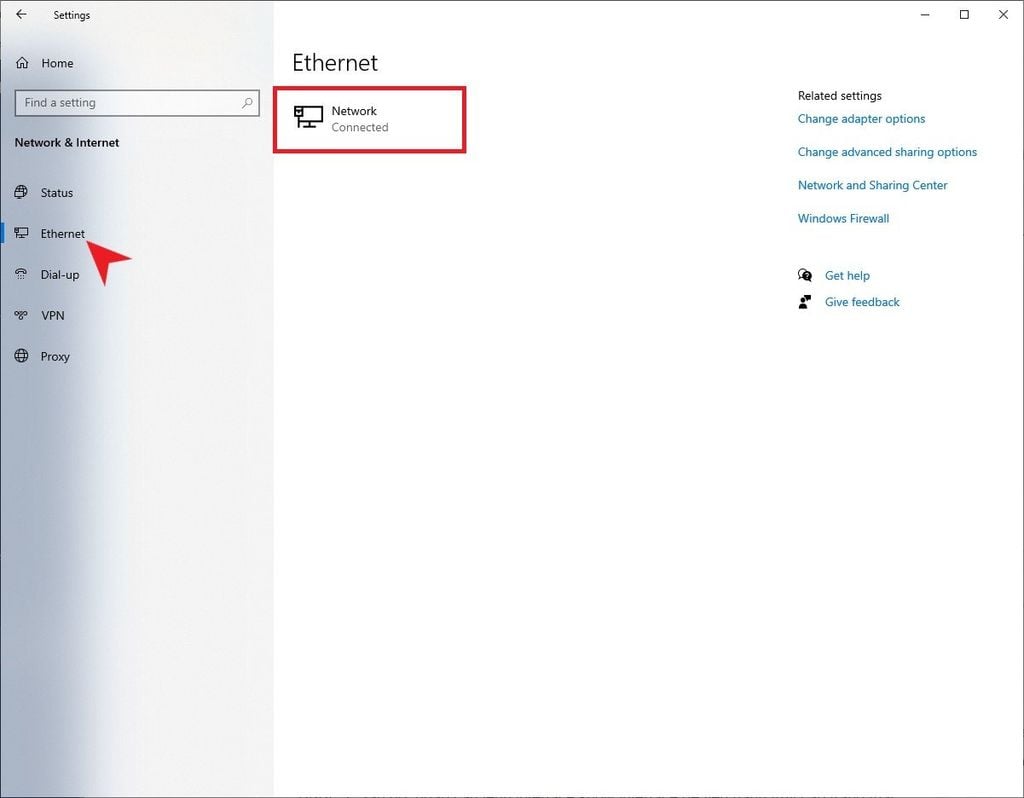
Step 3: Select Ethernet in the list in the left column, then click Network displayed in the window.
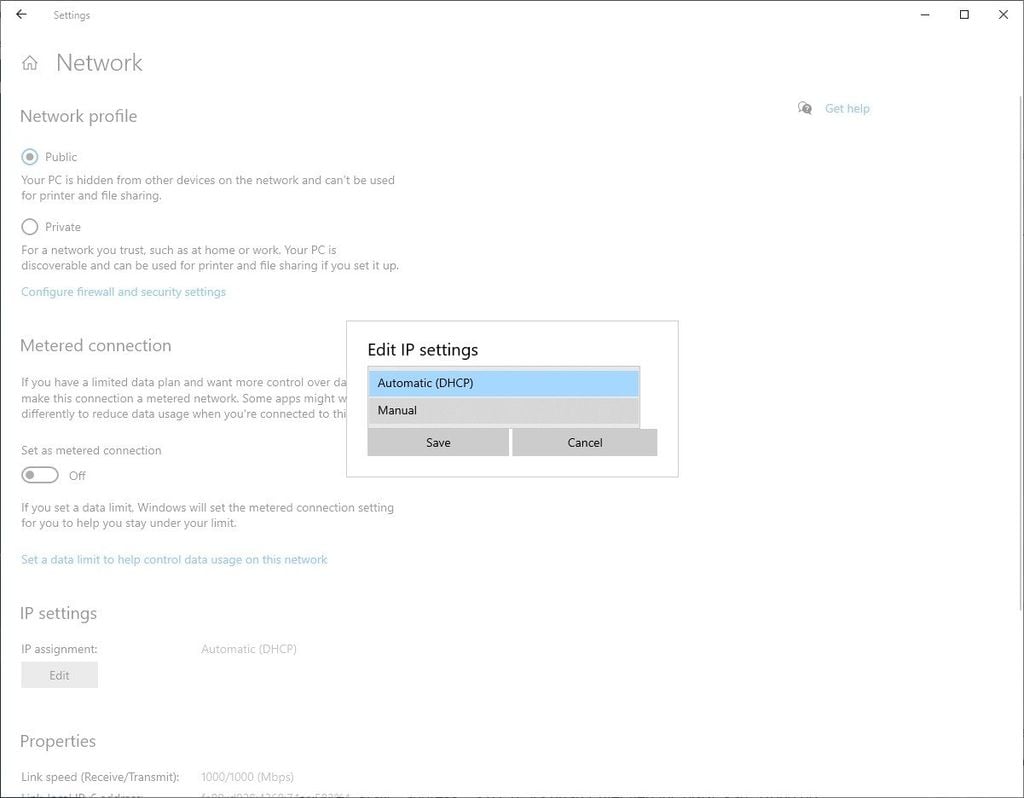
Step 4: Scroll down and find the button Edit in section IP settings.
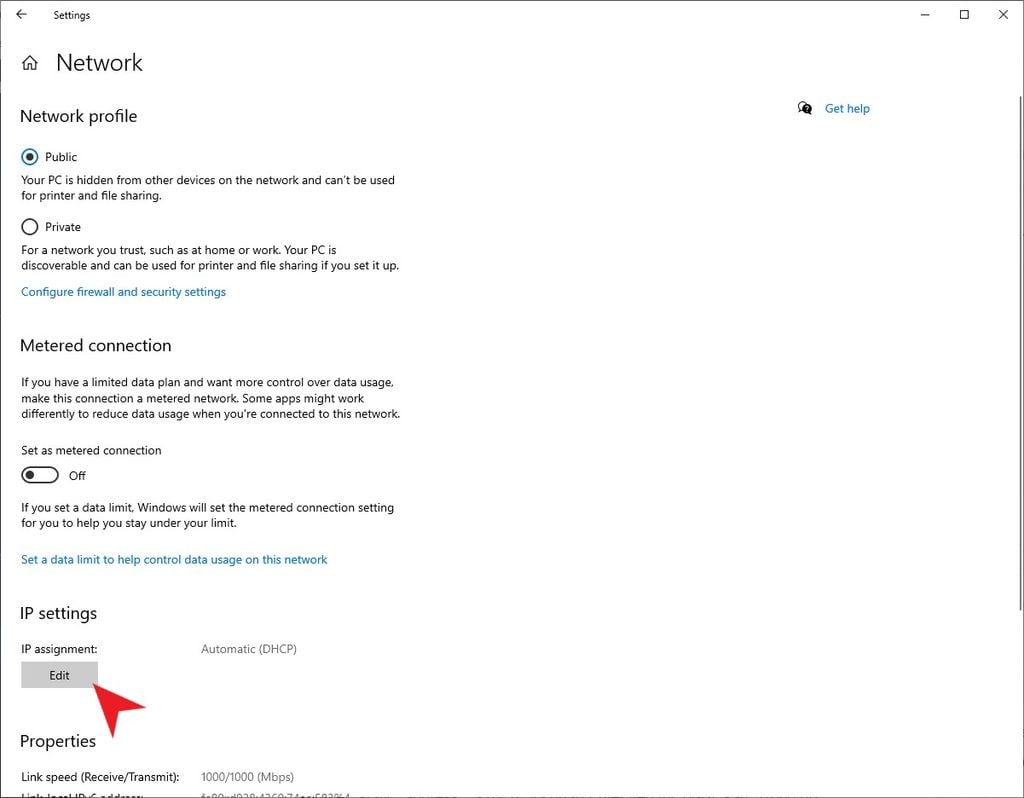
Step 5: Switch word selection Automatic (DHCP) sang Manual, then turn it on IPv4 by checking status On.
Step 6: Enter DNS information in two lines Preferred DNS và Alternate DNS according to the DNS addresses provided above.
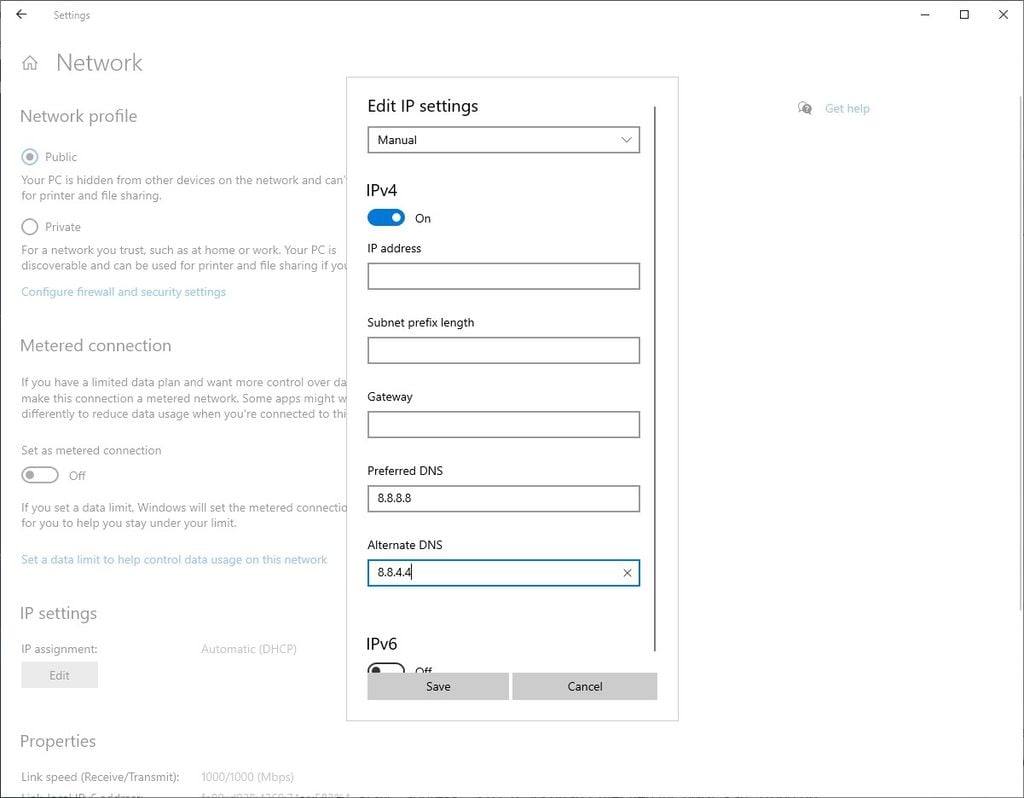
Step 7: Press Save to save the settings, then restart the computer to complete Adjust DNS.
3.3. Change DNS using Command Prompt (CMD)
Here's how to change DNS in Windows 10 and 11 using Command Prompt:
Step 1: Search Command Prompt or cmd in the menu Start, then run with admin rights by selecting Run as administrator.

Step 2: Enter command netsh to access the adjustment status change DNS Windows 10, then press Enter.
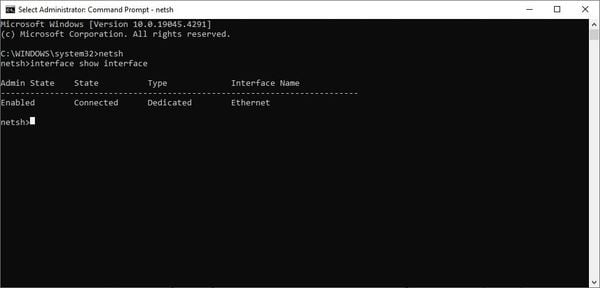
Step 3: Next, enter the command interface show interface to display necessary DNS information.
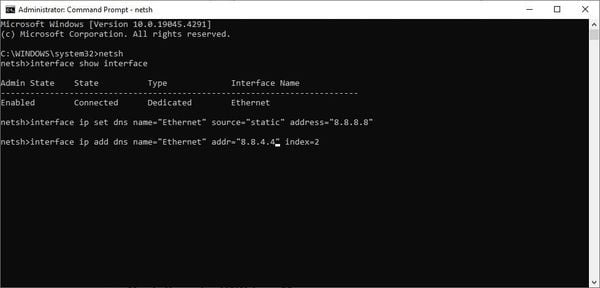
Step 4: Enter the command according to the following syntax: interface ip set dns name="Tên adapter"source="static" address="a.b.c.d" and press Enter to continue.
-
In which: Adapter name is the name of Interface Name. -
-
a.b.c.d is the first DNS address, which can be from services like Cloudflare (1.1.1.1), Google Public DNS (8.8.8.8), or OpenDNS (208.67.222.222)...
Step 5: Enter the command according to the following syntax: interface ip add dns name="Tên adapter"addr="w.x.y.z" index=2 and press Enter.
-
In which: Adapter name is the name of Interface Name.
-
w.x.y.z is the second DNS address, which can be from services like Cloudflare (1.0.0.1), Google Public DNS (8.8.4.4), or OpenDNS (208.67.220.220).
Step 6: Close Command Prompt and restart the computer to complete the process change DNS Windows 11 and 10.
4. How to change DNS on Mac quickly and safely
Instruct How to adjust DNS on Mac safely and effectively:
Step 1: Click menu Apple (apple logo) in the top left corner of the screen, then select System Preferences. When the window System Preferences appears, select the item Network.

Step 2: Open advanced options for Network by clicking Advanced….

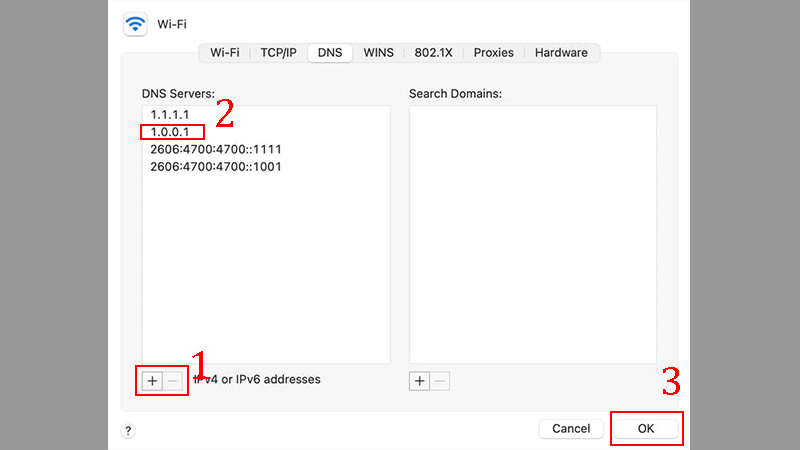
Step 3: Switch to the DNS tab, click the plus icon “+” first time to add Preferred DNS.
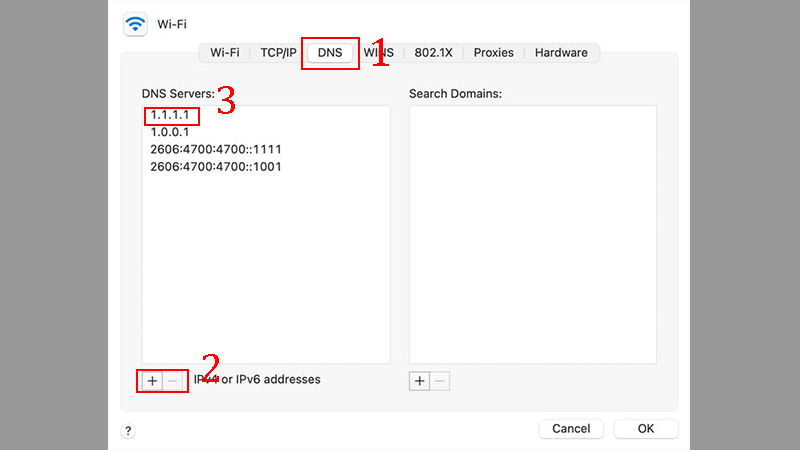
Step 4: Click the plus icon “+” again to add Alternate DNS, then press OK and Apply to save changes Change DNS on your computer.
5. Changing DNS on Other Platforms
Besides Windows 10, 11, and MacOS, you can change DNS for Windows XP and Vista.
5.1. Change DNS on Windows XP
Here it is How to change Google DNS on Windows XP operating system:
Step 1: Open the dialog box Control Panel, then select Network and Internet Connections and click item Network Connections.
Step 2: Right-click on the network connection in the window Network Connections and choose Properties.
Step 3: In the scroll down list, select Internet Protocol (TCP/IP) and click Properties.
Step 4: In the new window that appears, check the option Use the following DNS server addresses. At section Preferred DNS server, enter the address 208.67.222.222, and in the section Alternative DNS server, enter 208.67.220.220.
Step 5: Press OK, then click Close and Close again to close all windows. Finally, restart the computer to apply the settings Change computer DNS.
5.2. How to change Windows Vista DNS
Steps Adjust Google DNS on Windows Vista as follows:
Step 1: Please open Control Panel and choose Network and Internet, then click Network and Sharing Center.
Step 2: Click connect View Status on the right part of the screen. Screen Local Connection Status will appear, then select Properties.
Step 3: You will see a dialog box similar to the one in Windows XP, allows you to set up server usage OpenDNS.
Although DNS changes can enhance browsing speed and improve security, it might not be the best solution for MMO users. Using a Proxy with the anti-detection browser Hidemyacc is a comprehensive multi-account management solution that offers anonymity, access to blocked content, and protects personal data from tracking.
With Hidemyacc, you can easily alter Browser Fingerprint settings, manage multiple accounts, and create distinct online identities for an optimized online experience without detection. Try Hidemyacc with a 7-day free trial for effective multi-account management.