AdGuard DNS is a free DNS solution that helps users block advertisements and protect their accounts from malware. AdGuard DNS works by filtering requests to access unsafe or annoying websites. In this article, let Antidetect Browser Hidemyacc explore what AdGuard DNS is and provide detailed instructions on how to install AdGuard DNS on various devices such as computers and phones across different operating systems.
1. What is Adguard DNS?
AdGuard DNS is a DNS service provided by AdGuard, which helps block ads and protect users from online threats. By using AdGuard's DNS servers instead of default servers, it has the ability to filter ads and block malicious websites before your device even connects to them. This improves the browsing experience and enhances security.

2. Pros and Cons of Adguard DNS
AdGuard DNS is a useful solution for blocking advertisements and protecting user accounts. However, like any other service, this AdGuard DNS has its own advantages and disadvantages. Below is a comparison table of the strengths and limitations of AdGuard DNS.
| Pros | Cons |
| Easy Installation: AdGuard DNS does not require software or app installation, simply change the DNS settings. | Does Not Block All Ads: The free version of AdGuard DNS cannot block all types of advertisements. |
| Completely Free: This is an open-source service available for everyone to use. | Access Obstruction: Some websites require disabling ad-blockers to gain access. |
| High Security: The service integrates modern encryption standards such as DNSCrypt, DNS-over-TLS, and DNS-over-HTTPS. | Web Layout Impact: Blocking ads may leave empty spaces or broken layouts on web pages. |
| Easy Management: Offers Default and Family modes, making it easier for parents to manage children's access. | Usage Limits: You can only choose one of the two free versions: VPN or DNS. |
| Cross-Device Compatibility: Supports most devices including phones, computers, and tablets. | Limited Management Capabilities: Users need to purchase additional services to access full features. |
| Data Safety: AdGuard claims they do not log or store user data. | |
| Increased Speed: AdGuard DNS blocks ads, which helps speed up website loading times. |
>>>> SEE MORE:
- What is DNS? Functions, operating mechanisms, and how to use it effectively
- What is DNS Google? Detailed guide to change Google DNS on various devices
3. Modes in AdGuard DNS
AdGuard DNS provides multiple modes for users to easily adjust according to personal needs, ensuring flexibility in online control and security. Below are the main modes available in AdGuard DNS:
- Default Mode: This is the default mode, which blocks advertisements, prevents malware, and protects users from websites with malicious content.
- Family Protection: Specifically designed to protect children, this mode blocks family-inappropriate content such as adult or harmful websites.
- No Filtering: In this mode, AdGuard DNS does not perform any blocking, allowing users to maintain access without filtering.
- Custom Mode: Users can customize the blocklist as desired, selecting types of content to block or bypass based on personal needs.
- Acceleration Mode (DNS-over-HTTPS/DNS-over-TLS): Security is enhanced as DNS data is encrypted, preventing third parties from tracking your DNS queries.
- DNS Query Log: When activated, this mode allows for the recording of DNS query history, helping users monitor and audit network activity.
The above modes offer flexibility in controlling security and the browsing experience for users, catering to different needs regarding safety and content management.
The modes on AdGuard DNS provide flexibility in security control and the browsing experience.
>>>> FURTHER REFERENCE:
- What is DNS 1.1 1.1? How to set up & change DNS 1.1 1.1 quickly
- Change DNS on Win 10, 11 and Mac simply and quickly
- What is a DNS Zone? Benefits and effective DNS Zone management
4. How to install AdGuard DNS for computers
To use AdGuard DNS on computers with operating systems such as Windows, macOS, or Ubuntu, you only need to perform a few simple configuration steps as follows:
4.1. Install AdGuard DNS for Windows
For the Windows operating system, you can follow these steps to install AdGuard DNS for your computer:
Step 1: Open network settings: Right-click the network icon on the Windows taskbar and select Open Network & Internet settings. Then, select Network and Internet and click on Change adapter options.
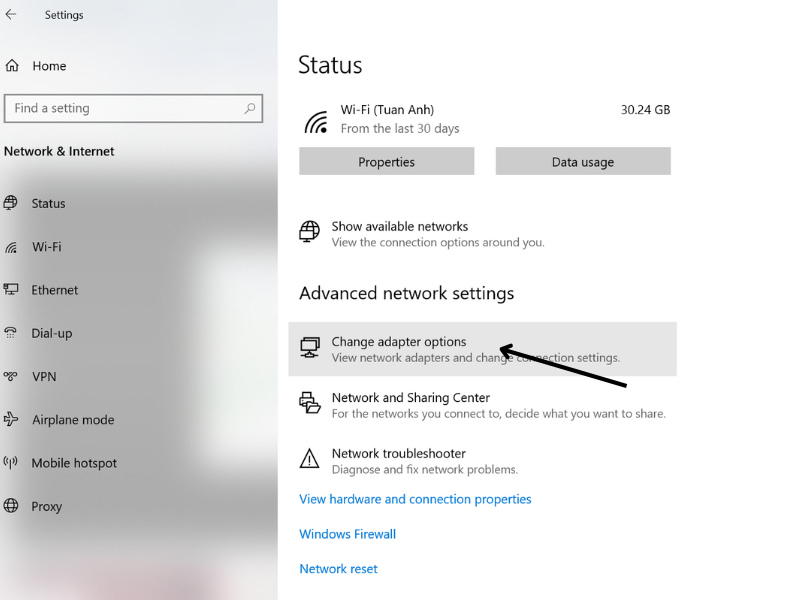
Select Change adapter options in Network and Internet.
Step 2: Select network connection: Here, right-click on the network connection you are currently using (Wi-Fi or Ethernet) and select Change settings of the connection.

Select the network connection you are currently using
Step 3: DNS Configuration: Select Internet Protocol Version 4 (TCP/IPv4) and click Properties. In the Use the following DNS server addresses section, enter the AdGuard DNS addresses:
- Preferred DNS server: 176.103.130.130
- Alternate DNS server: 176.103.130.131
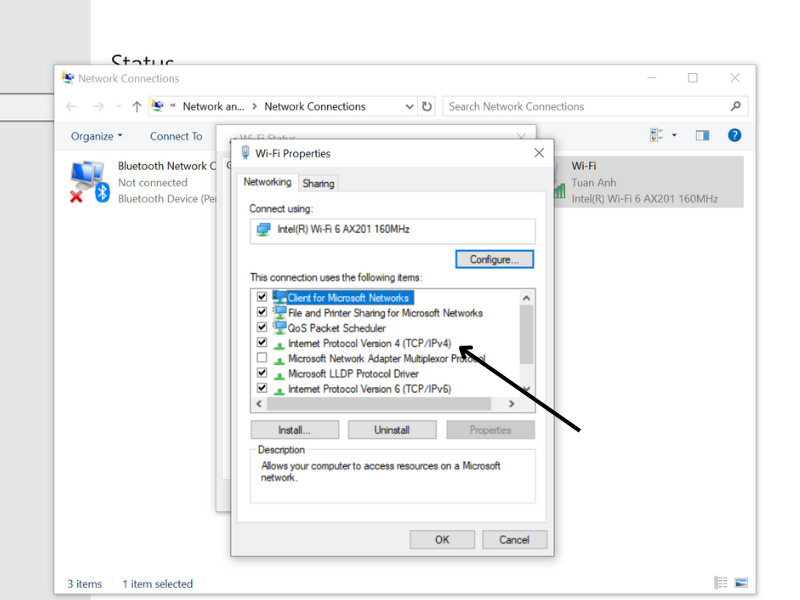
Click on Internet Protocol Version 4 (TCP/IPv4).
Step 4: Save settings: Press OK and select Close to complete the installation process.
4.2. Install AdGuard DNS for macOS
Below are the steps to help you install AdGuard DNS for macOS users:
Step 1: Open network settings: Users access System Settings (or System Preferences) and select Network.
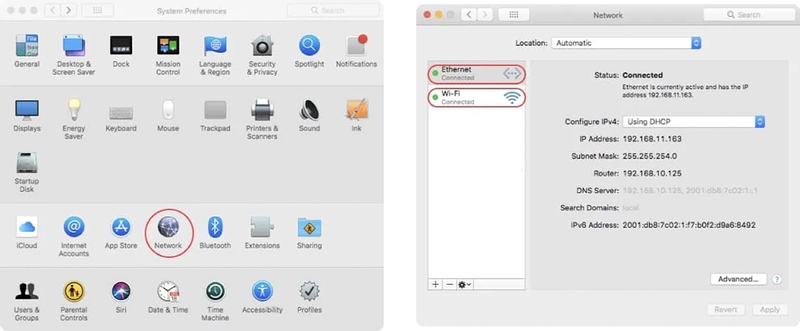
Users select Network in System Preferences.
Step 2: Select network to configure DNS: Select the Wi-Fi or Ethernet connection you wish to configure, then click on Advanced and select the DNS tab.
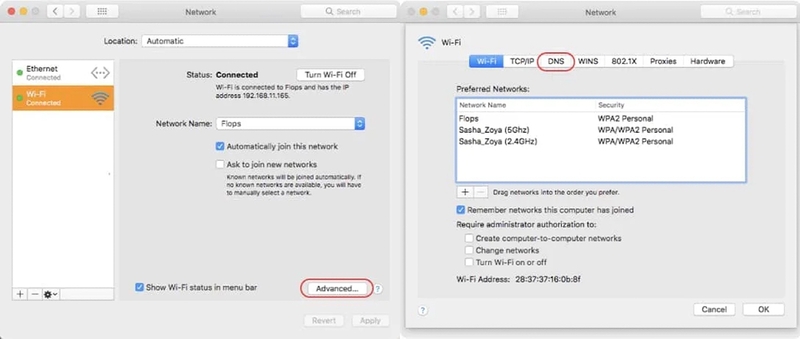
Click on Advanced and select the DNS tab in Wi-Fi.
Step 3: Add AdGuard DNS: Click the + icon to add the DNS addresses:
- Preferred DNS server: 176.103.130.130
- Alternate DNS server: 176.103.130.131
Step 4: Save information: Click OK to save the settings.
4.3. Install AdGuard DNS for Ubuntu
With the Ubuntu operating system, you can install AdGuard DNS according to the following detailed instructions:
Step 1: Open network settings: Access Settings, then select Network.
Step 2: Select network connection: Click on the connection you want to configure (Wi-Fi or Ethernet).
Step 3: DNS Configuration: Select the IPv4 tab, then choose Automatic (DHCP) addresses only. Enter the AdGuard DNS addresses:
- Preferred DNS server: 176.103.130.130
- Alternate DNS server: 176.103.130.131
Step 4: Apply and save: Click Apply to save the changes and complete the installation.
When installing AdGuard DNS on a computer, you can also download the AdGuard DNS software to enhance ad-blocking capabilities and privacy protection, prevent tracking, and increase browsing speed, helping you surf the web more safely and smoothly.
>>>> RELATED ARTICLES:
-
Effective ways to change DNS to block ads on phones and computers
- How to fix dns_probe_finished_nxdomain error on mobile phones
5. How to install AdGuard DNS for mobile phones
Installing AdGuard DNS on mobile phones will help you block advertisements and protect your device from online threats. Below is the specific guide for installing AdGuard DNS on Android and iOS.
5.1. Install AdGuard DNS for Android
Users can download AdGuard DNS when using Android devices by following these steps:
Step 1: Download the AdGuard app: First, download the AdGuard app from the Google Play Store. After installation, open the app and go to Settings.
Step 2: Enable DNS Filtering: In the DNS Filtering section, you will see a list of DNS servers. Select AdGuard DNS or AdGuard DNS Family Protection to block ads and protect your family from inappropriate content.
Step 3: Use the selected DNS server: Click on Use this server to start using AdGuard DNS on your device.
If you do not use the app, you can manually install AdGuard DNS on Android as follows:
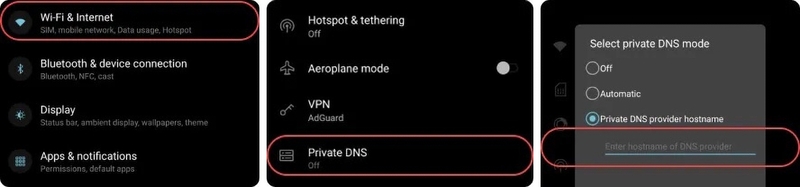
- Step 1: From the home screen, go to Settings > Wi-Fi.
- Step 2: Select the Wi-Fi network you are using, press and hold it, then select Modify Network.
- Step 3: In Advanced options, change IP settings from DHCP to Static.
- Step 4: Then, enter the AdGuard DNS addresses as follows:
- DNS 1: 176.103.130.130
- DNS 2: 176.103.130.131
- Step 5: Press Save to save the changes.
You can apply the above steps to install AdGuard DNS for your phone.
5.2. Install AdGuard DNS for iOS
For the iOS operating system, you can follow these instructions to install AdGuard DNS:
Step 1: Download AdGuard for iOS: Open the App Store and download the AdGuard for iOS app. After installation, open the app and access the Tracking Protection section.
Step 2: Enable DNS protection: In the Tracking Protection menu, toggle the switch on and go to the DNS encryption section.
Step 3: Select DNS: Here, you can choose AdGuard DNS or AdGuard DNS Family depending on your protection needs.

Search for AdGuard DNS in the App Store and download it.
You can also manually install AdGuard DNS for iOS without using the app by following these steps:
Step 1: Open Settings from the home screen.
Step 2: After that, select Wi-Fi and tap on the name of the Wi-Fi network you are connected to.
Step 3: Locate the DNS field and enter the DNS addresses:
- DNS 1: 176.103.130.130
- DNS 2: 176.103.130.131
Step 4: Press Save to complete.
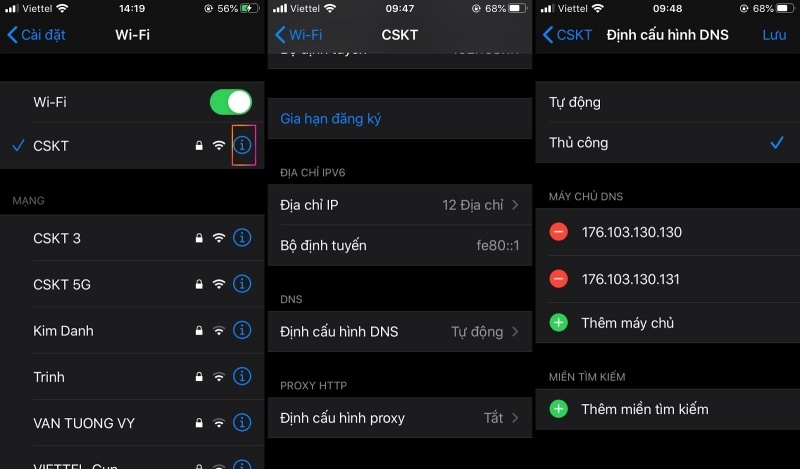
You can access the network settings to manually install AdGuard DNS for iPhone.
Installing AdGuard DNS is a simple yet effective solution to protect your devices from advertisements and potential internet threats. We hope the information in this article helps you set up AdGuard DNS on any operating system to enjoy a safe browsing environment free from annoying ads. If you have any further questions, contact Antidetect Browser Hidemyacc immediately for support!
>>>> ARTICLES WITH THE SAME TOPIC: