Flush DNS is one of the effective methods to help users fix errors when they cannot access websites, such as 404 Page Not Found, 502 Bad Gateway... So, what is Flush DNS and how do you use it? Let's refer to the article below by Antidetect Browser Hidemyacc!
1. What is Flush DNS?
Flush DNS can be simply understood as the process of clearing the DNS cache on a computer. When using the Internet, if a website changes its IP address or moves to another server but the DNS cache still stores the old information, this will lead to access errors.
As a result, even though your network connection is normal, you may encounter a situation where you cannot access the website, and the system will display a 404 Page Not Found error. Therefore, Flush DNS has the task of helping the computer update information and successfully access the website quickly.

Flush DNS is the process of clearing the DNS cache on a computer.
2. What is DNS Cache?
DNS Cache is a temporary storage installed on operating systems like Windows and macOS used to store all information related to domain name resolution. DNS servers function to convert domain names from text format into numerical IP addresses so that computer systems can process them. When you open a website, your browser automatically contacts name servers to perform this process.
However, constantly looking up DNS can be time-consuming and sometimes lead to server overload. As a result, systems frequently report errors such as "DNS server not responding" or "dns_probe_finished_nxdomain."
Therefore, DNS Cache helps store information about previously searched DNS records, with each record having a specific Time to Live (TTL). During the TTL period, the system can answer DNS queries directly from the cache without needing to contact the DNS server again, significantly increasing network access speed.
DNS Cache is temporary storage installed on computers and Internet browsers.
>>>> SEE MORE:
- What is Zone DNS? Benefits and effective DNS Zone management
- What is Adguard DNS? How to install AdGuard DNS on all devices
3. Why should you regularly Flush DNS?
Because entries remain stored in the cache until the TTL expires, users should regularly Flush DNS for the following reasons:
- Hide search activities Tracking user activity on websites is often done through JavaScript and Cookies, but DNS Cache is also a potential target for bad actors. Through the DNS Cache, attackers can collect your personal data and browsing history. The more information and specific addresses stored in the cache, the more vulnerable a user becomes to data leaks. Therefore, you should Flush DNS regularly to protect your privacy.
Flush DNS helps users hide their search activities on the network system.
- Preventing spoofing and cyber attacks Due to security concerns, users must frequently clear their DNS cache (Clear DNS Windows). The information stored in the cache is highly transparent; if bad actors gain access to the DNS cache, they can easily spoof entries and redirect you to malicious websites containing viruses to steal sensitive information, such as bank login data.
- Quickly resolving technical issues For operating systems like Windows or macOS, Flush DNS is an effective solution when users encounter problems accessing web applications. This is caused by old entries in the DNS cache that can prevent a website from displaying the correct version, as the domain may be saved with an outdated or incorrect IP address.
Clearing the DNS cache helps the system reconnect to the appropriate DNS server, allowing applications to function normally again. Additionally, users can check the current DNS cache by entering the command “ipconfig /displaydns” in the Command Prompt on Windows systems.

Clearing the cache helps you quickly resolve technical errors.
>>>> SEE ALSO:
- What is Chrome net internals DNS? How to clear DNS cache in Chrome
- What is DNS Google? Detailed guide to change Google DNS on multiple devices
4. How to Flush DNS Cache on Your Computer
To maintain performance and security while using the Internet, regularly flushing the DNS Cache is truly essential. Below, Hidemyacc will guide you on how to clear the DNS Cache on two popular operating systems: macOS and Windows.
4.1 Guide to Flush DNS on macOS
For users on the macOS operating system, follow these steps to clear the cache on your computer:
Step 1: Press the key combination “CMD + Space” to open Spotlight Search.
Step 2: Type “Terminal” or you can open the Terminal app in the Other folder of Launchpad.
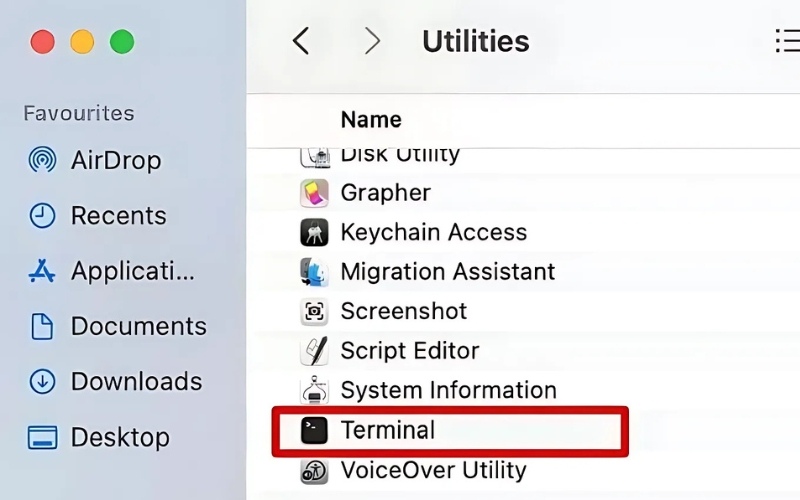
Guide on how to clear the cache on the macOS browser
Step 3: In the Terminal window - type the command: “sudo dscacheutil -flushcache; sudo killall -HUP mDNSResponder."
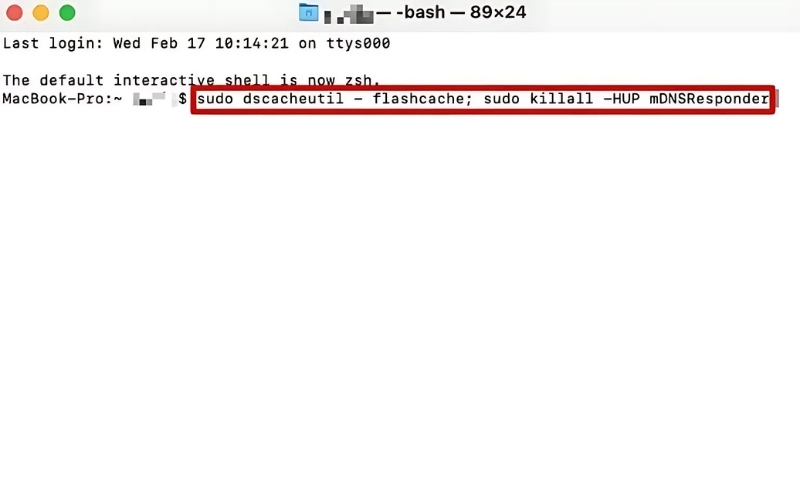
Type the command “sudo dscacheutil -flushcache; sudo killall -HUP mDNSResponder” in the Terminal window.
Step 4: Log in to your account.
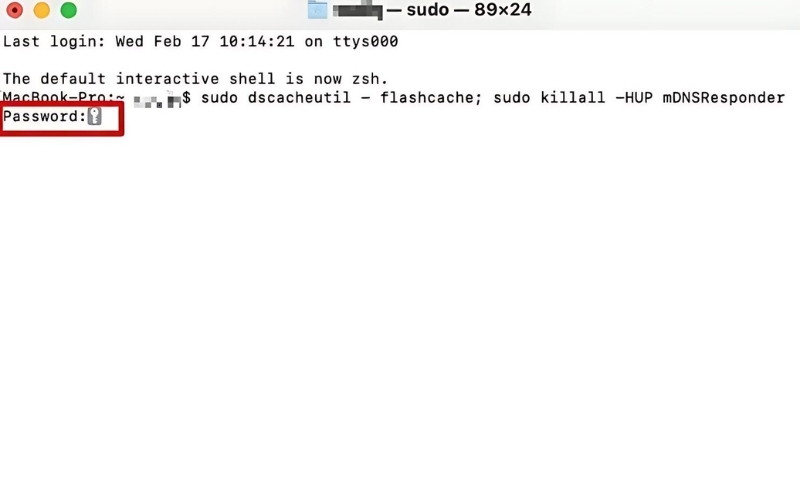
The system will prompt the user to log in to their account.
Step 5: Once logged in successfully, the system will report that the DNS Cache has been cleared successfully.
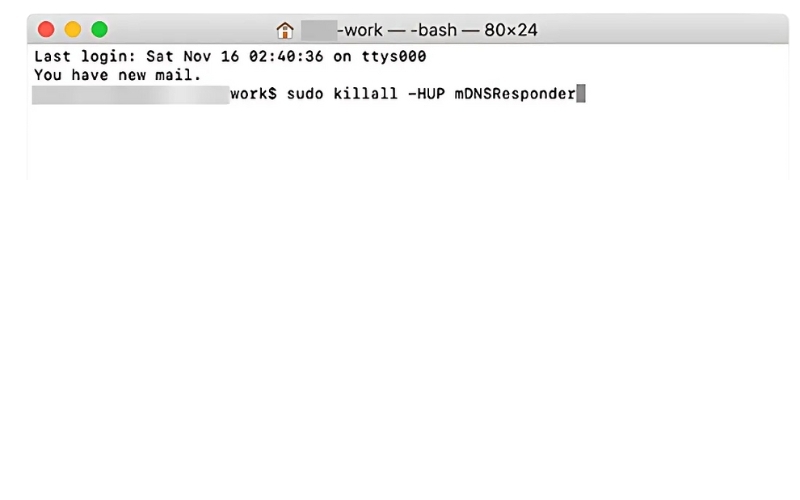
After a successful account login, the system will clear the DNS Cache.
4.2 How to clear DNS Cache on Windows
For those using the Windows operating system, to clear the DNS Cache, you need to perform the following steps:
Step 1: Open the Run dialog box by pressing the Windows + R key combination.
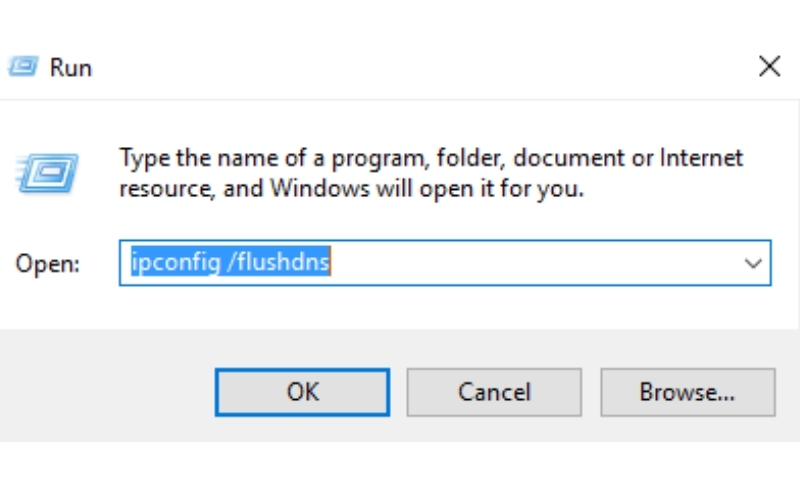
Open the RUN dialog box using the Windows + R key combination.
Step 2: Type “ipconfig /flushdns” and press Enter.
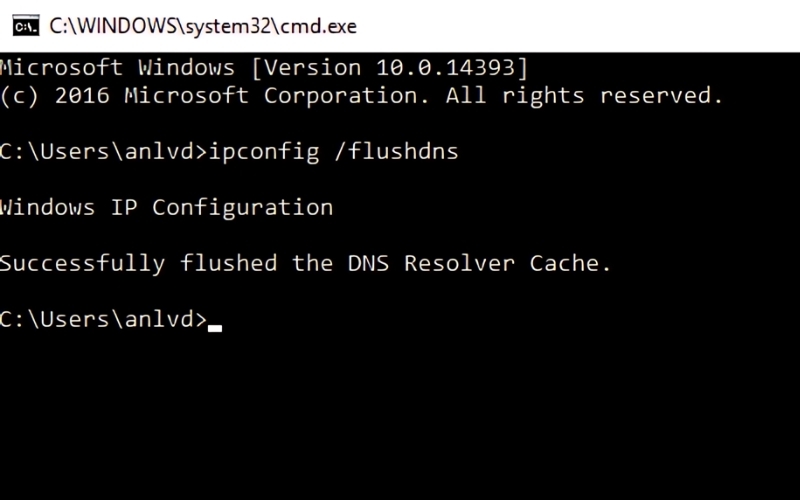
Type “ipconfig /flushdns” in the Command Prompt dialog box.
Step 3: Press the Ctrl + L key combination to launch Chrome and move the cursor to the URL address bar.
Step 4: Enter the following URL into the address bar and press Enter: chrome://net-internals/#dns

The user enters the URL path chrome://net-internals/#dns into the browser.
Step 5: Click Clear Host Cache to delete the list of previously visited websites.
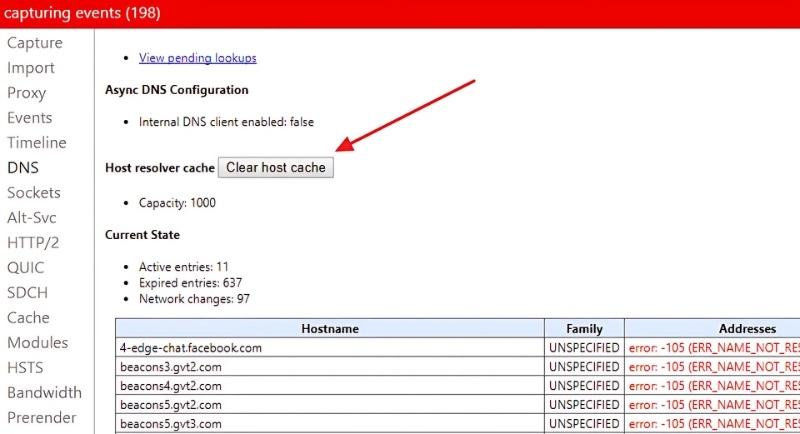
Click Clear Host Cache to delete the list of visited websites and accessed IP addresses.
Step 7: Click the Close idle sockets and Flush socket pools buttons in sequence to close all browser sockets.
>>>> LEARN MORE:
- What is DNS 1.1 1.1? How to install & change DNS 1.1.1.1 quickly
- Change DNS on Win 10, 11, and Mac simply and quickly
- DNS server not responding? 15 Effective ways to fix it
5. How to Flush DNS Cache on Browsers
In addition to clearing the DNS cache on your computer, you can also perform this action on browsers such as Chrome, Firefox, Coc Coc, etc., to minimize "404 page not found" or "502 bad gateway" errors when accessing the Internet. Below are the most detailed instructions on how to Flush DNS Cache on several browsers.
5.1 For the Chrome Browser
If you are using the Google Chrome browser to access the Internet, here are the steps to quickly Flush DNS Cache for your reference.
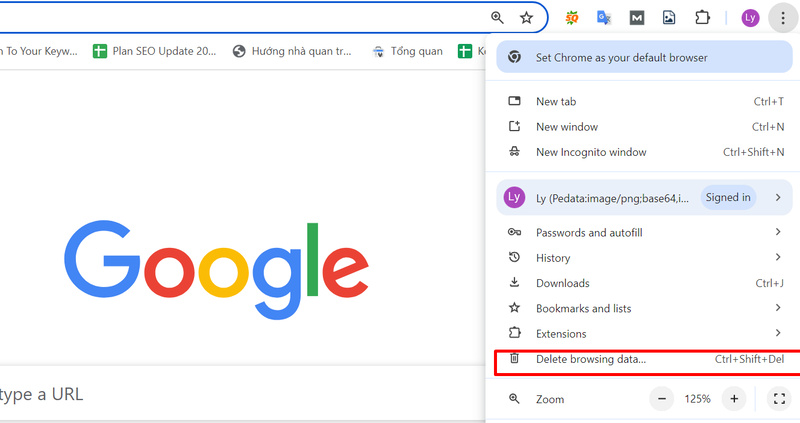
Step 1: Click on the “three dots” icon in the upper right corner of the Google screen.
Step 2: Click on More tools - select Clear browsing data…
Clear browsing data on Google Chrome
Step 3: Select the Time range - choose the data you want to delete - click Clear data.
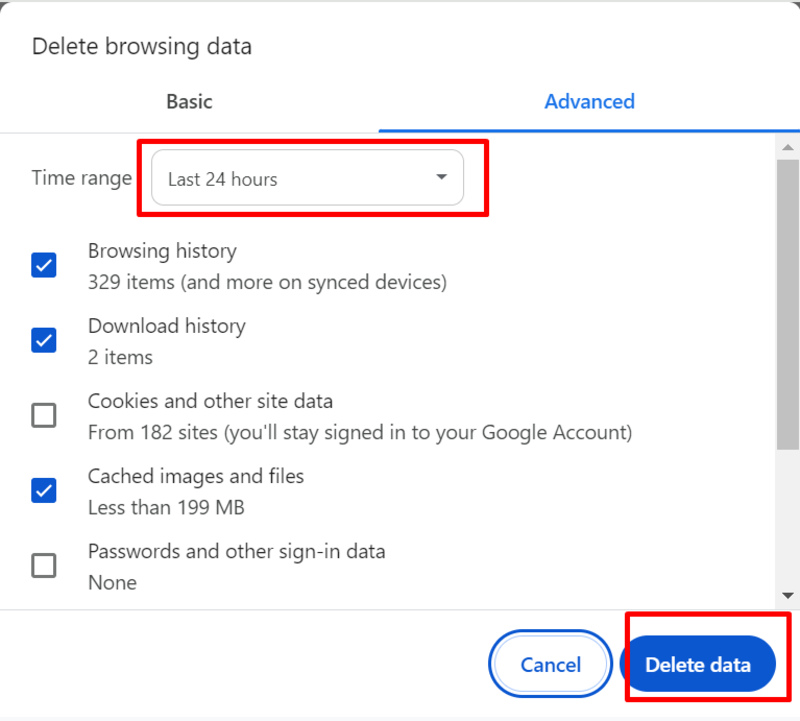
Select the time range to clear data.
Additionally, if you want to delete website history and cookies, go to the Advanced tab to configure your browser settings.
5.2 For the Firefox Browser
To clear the cache on the Firefox browser, you need to follow these steps:
Step 1: Open the Firefox browser - Type “about:preferences#privacy” in the search box to open the “Privacy & Security” page.
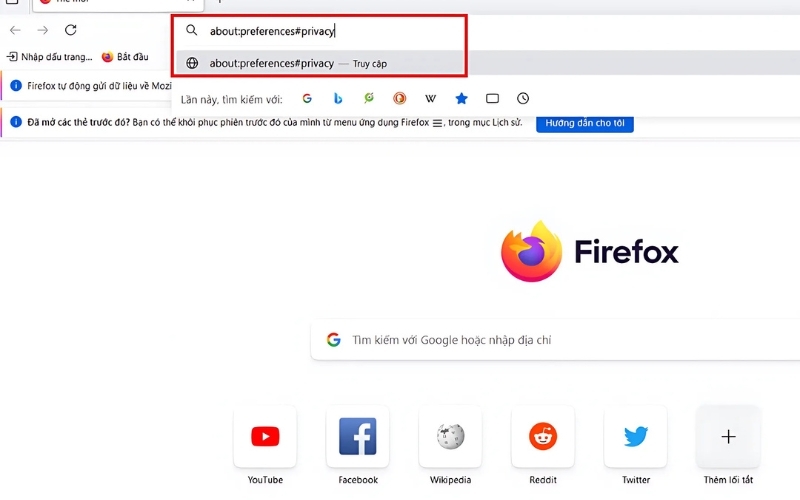
Clear Windows DNS on the Firefox browser
Step 2: Find the Cookies and Site Data section - select Clear Data.
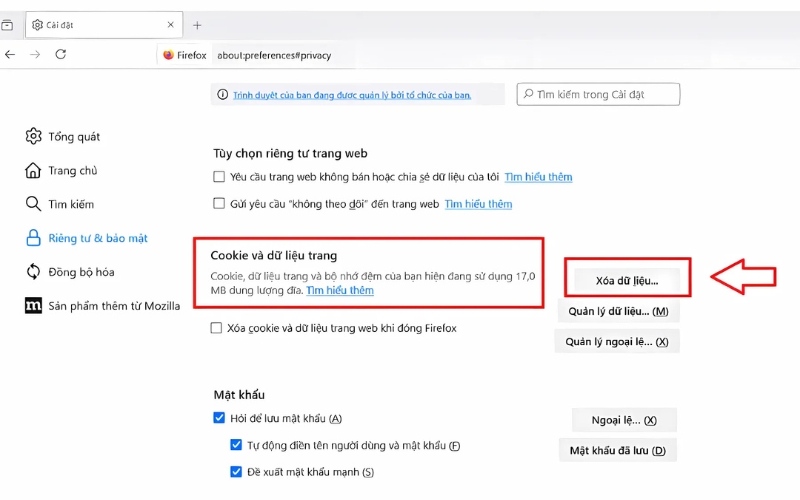
Find the Cookies and Site Data section to clear data.
Step 3: Select Cached Web Content in the clear data section.
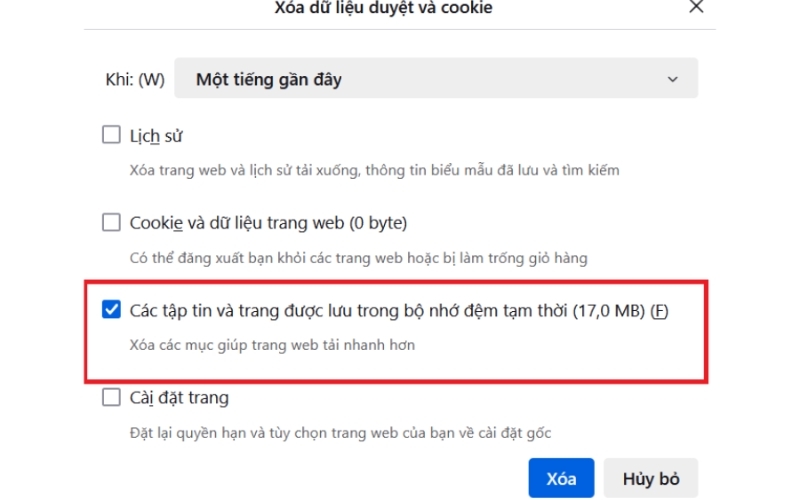
Select the stored files section to clear data in the temporary memory.
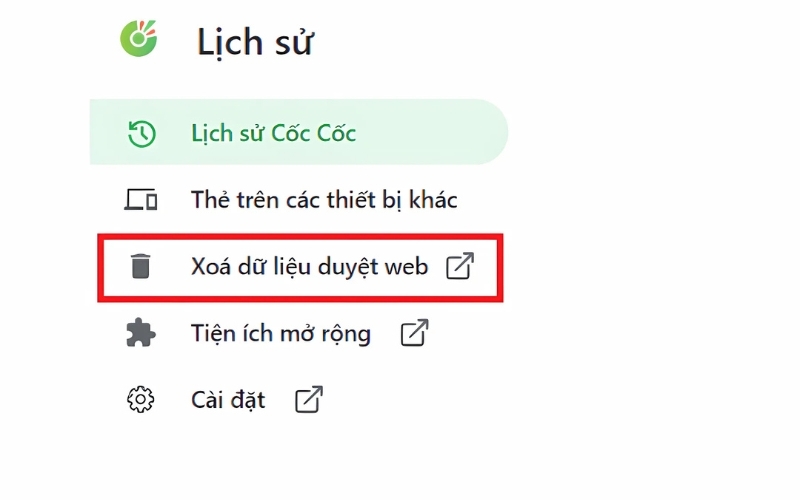
5.3 For the Coc Coc Browser
Step 1: Open the Coc Coc browser - press the Ctrl + H key combination.
Open the Coc Coc browser
Step 2: Select the Time range - select Clear data
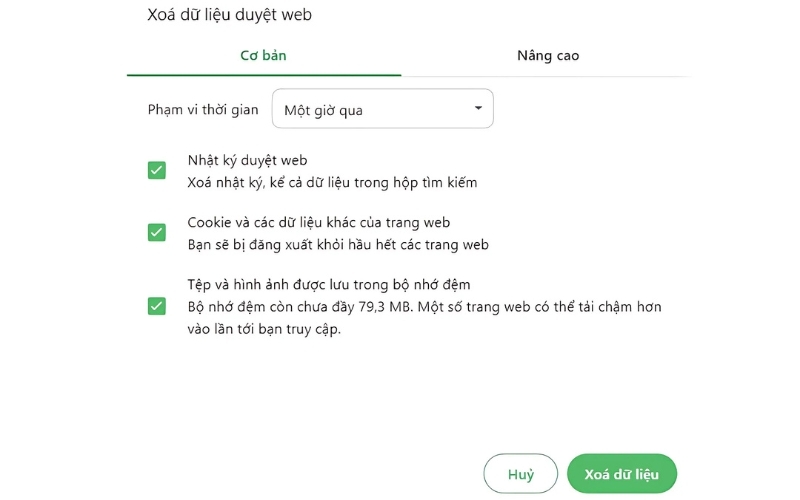
Select the time range and clear data
In the article above, Hidemyacc has explained what Flush DNS is and how to clear the DNS Cache on your browser and computer. We hope this useful information helps you quickly fix access errors and enhance data security related to DNS. If you have any questions about Hidemyacc, please contact us for the fastest assistance!
>>>> RELATED ARTICLES: